
The Ultimate Bombs Recipe: Explosive Flavor in Every Bite
Hot bombs burst onto the culinary scene as tantalizing morsels that pack an incredible punch of taste and excitement.
These compact delicacies elevate ordinary ingredients into extraordinary flavor experiences that dance across your palate.
Small yet mighty, hot bombs represent a perfect fusion of creativity and culinary innovation, challenging traditional snack expectations.
Each morsel contains carefully balanced components designed to surprise and delight hungry food enthusiasts.
Bold spices and unexpected ingredient combinations elevate these miniature flavor grenades beyond simple appetizers.
Their versatile nature allows for endless experimentation, making them a favorite among adventurous cooks and food lovers alike.
Prepare to revolutionize your snacking experience with these irresistible flavor-packed sensations.
Hot Bombs: A Spicy, Cheesy Explosion of Flavor
Key Ingredients for Hot Bombs
Chocolate and Coating:Filling Ingredients:Equipment and Preparation Tools:How to Make Hot Bombs That Pack a Punch

Step 1: Melt Chocolate
In a microwave-safe bowl, carefully melt chocolate according to package instructions. Stir until smooth and glossy.
Step 2: Prepare Mold Surface
Place a silicone mold on a sturdy cookie sheet or jelly roll pan for stability.
Step 3: Create Chocolate Shells
Spoon 1/2-of melted chocolate into each mold cavity. Use the back of a spoon to evenly coat the sides, creating thin chocolate shells.
Step 4: Freeze and Reinforce
Freeze the chocolate mold for 10 minutes. Check for thin spots and carefully add more melted chocolate to reinforce. Return to freezer for an additional 5 minutes.
Step 5: Release Chocolate Halves
Gently peel back the silicone mold to release the chocolate shells.
Step 6: Warm and Shape Edges
Heat a small skillet or plate until just warm to the touch. Place one chocolate half with the rounded side up to slightly melt the edges.
Step 7: Fill Chocolate Half
Place the warmed chocolate half on a cookie sheet. Fill with ingredients:Step 8: Seal the Bomb
Warm the second chocolate half and carefully place it on top of the filled half. Gently press to fuse the edges together.
Step 9: Optional Decoration
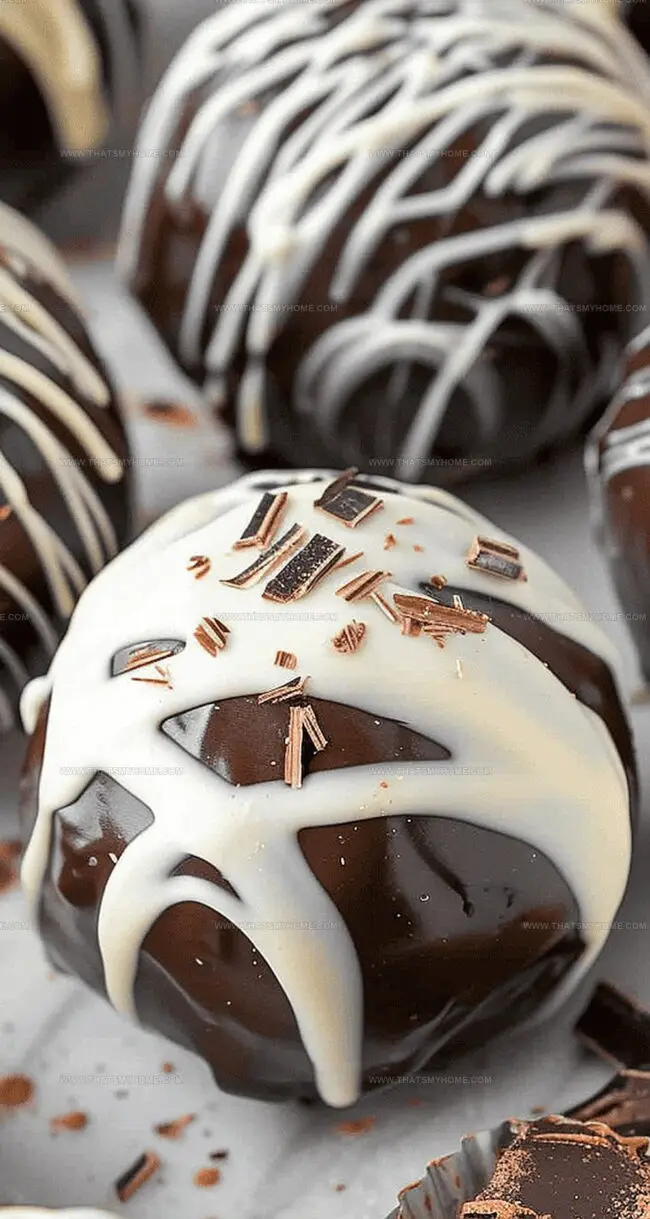
If desired, drizzle additional melted chocolate over the hot chocolate bomb for extra flair.
Tips for Perfectly Spicy Hot Bombs
How to Store and Keep Hot Bombs Fresh
Delicious Pairings for Hot Bombs
Fun Twists on Hot Bombs
Print
Bombs Recipe
- Total Time: 50 minutes
- Yield: 6 1x
Description
Mexican hot bombs explode with zesty chocolate and chili flavors, creating a spicy-sweet symphony in your mug. Quick and easy to prepare, these gourmet drink companions will transport you to culinary bliss with their rich, warming embrace.
Ingredients
Hot Bombs
Main Ingredients:
- 6 cups (1.4 liters) whole milk
Supporting Ingredients:
- 1 tablespoon (15 milliliters) vanilla extract
- ¼ cup (60 milliliters) honey
Garnish Ingredients:
- ½ cup (120 milliliters) whipped cream
- 2 tablespoons (30 milliliters) chocolate shavings
- 1 tablespoon (15 milliliters) cocoa powder
Instructions
- Prepare a microwave-safe bowl and melt high-quality chocolate according to manufacturer’s guidelines, stirring until achieving a glossy, smooth consistency.
- Position a silicone mold onto a sturdy cookie sheet or jelly roll pan for stability during preparation.
- Carefully spoon approximately 1/2 to of molten chocolate into each mold cavity, utilizing the back of a spoon to create an even, uniform coating along the sides.
- Transfer the chocolate-lined mold to the freezer for approximately 10 minutes, allowing the chocolate to set and harden completely.
- Inspect the chocolate shells for any thin or translucent areas, and reinforce those sections with an additional layer of melted chocolate, then return to the freezer for another 5 minutes.
- Gently extract the chocolate halves from the silicone mold by carefully peeling back the flexible surface.
- Warm a small skillet or ceramic plate until it reaches a temperature just comfortable to touch, then delicately melt the edges of one chocolate half by placing it rounded side up on the heated surface.
- Position the first chocolate half on the cookie sheet and generously fill with of rich hot cocoa mix and 10-12 miniature marshmallows.
- Repeat the edge-warming process with the second chocolate half, then carefully place it atop the filled base, gently pressing to fuse the edges together.
- Optional: Embellish the hot bomb with additional melted chocolate drizzles or decorative patterns for an enhanced visual appeal.
Notes
- Master melting techniques by using microwave-safe bowls for smooth chocolate preparation.
- Silicone molds create perfect shell shapes for your delightful hot bombs.
- Coat chocolate sides evenly, ensuring thick and sturdy chocolate shells.
- Freezing helps strengthen chocolate halves and prevents cracking during assembly.
- Gentle warming techniques seal chocolate edges seamlessly without breaking delicate shells.
- Mini marshmallows and cocoa mix transform simple chocolate into exciting winter treats.
- Prep Time: 50 minutes
- Cook Time: 0 minutes
- Category: Lunch, Dinner
- Method: None
- Cuisine: American
Nutrition
- Serving Size: 6
- Calories: 600 kcal
- Sugar: 60g
- Sodium: 240mg
- Fat: 30g
- Saturated Fat: 18g
- Unsaturated Fat: 12g
- Trans Fat: 0g
- Carbohydrates: 66g
- Fiber: 0g
- Protein: 36g
- Cholesterol: 180mg
Mary Ellen
Founder, Pastry Chef & Recipe Developer
Expertise
Education
Savannah Technical College
Mary Ellen is the heart and soul of thatsmyhome.com. As the founder, pastry chef, and recipe developer, she refined her skills at Savannah Technical College with an Associate of Applied Science in Culinary Baking & Pastry Arts.
Mary blends classic techniques with modern twists to make artisanal breads, beautifully crafted pastries, and desserts full of unique flavor. Her passion is evident in every recipe, and she enjoys sharing her expertise through hands-on pastry workshops and insightful articles in local culinary magazines.