
Irresistible Grilled Corn On The Cob Recipe – Summer’s Perfect Side
Fancy grilled corn on the cob reinvents an ordinary side dish into a culinary masterpiece that sparks excitement.
Summertime gatherings come alive with this mouthwatering delicacy that beckons friends and family around the grill.
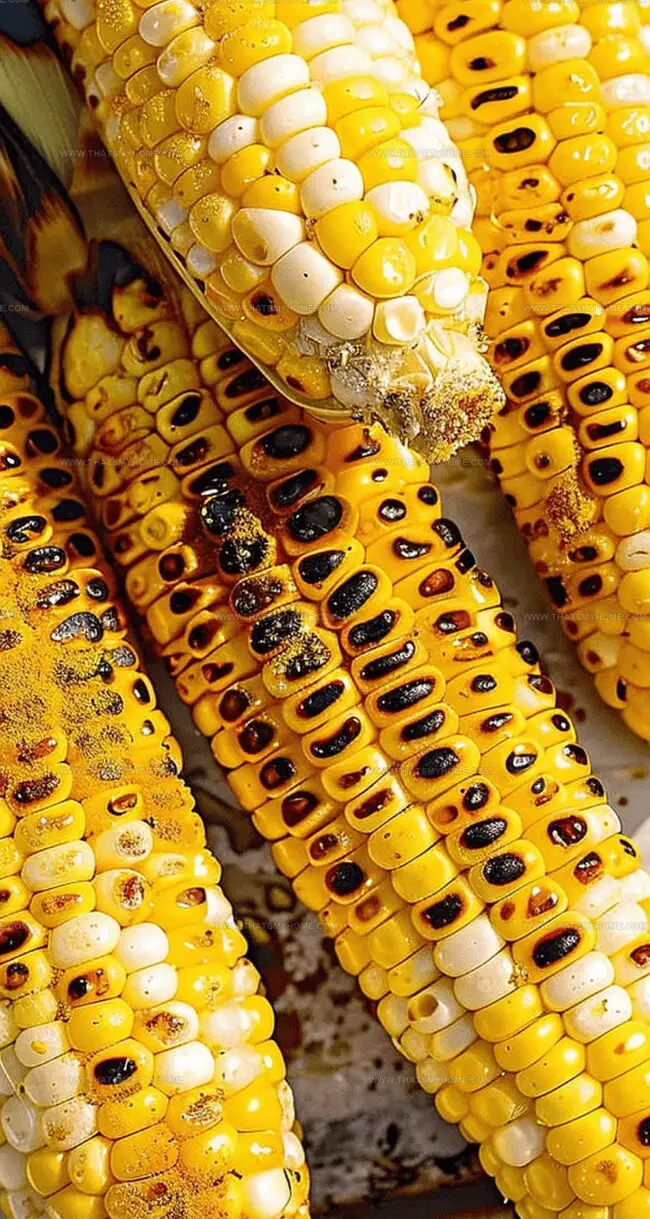
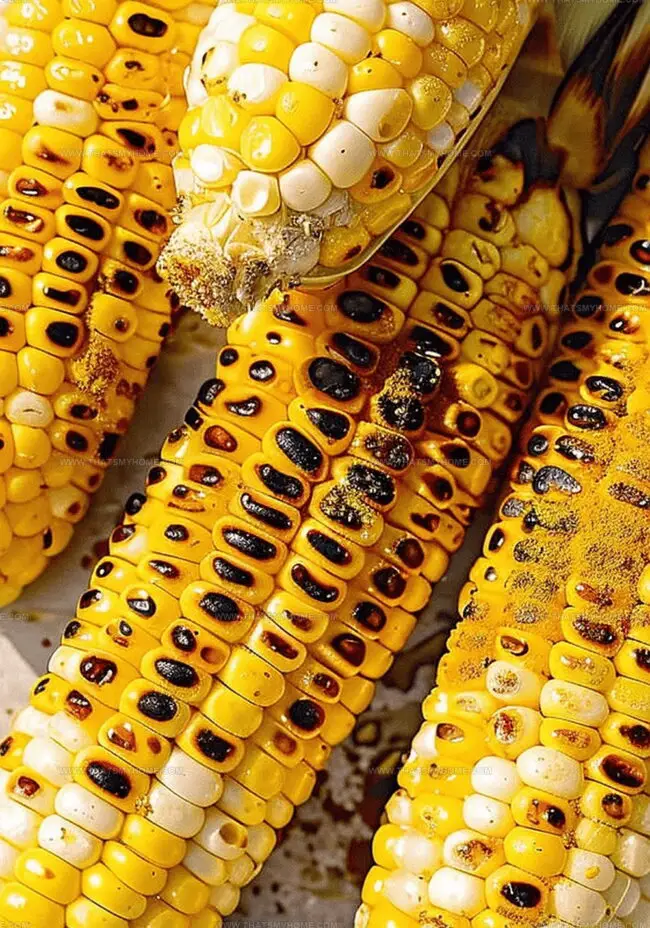
Each kernel promises a smoky, caramelized sensation that dances between rustic charm and gourmet elegance.
the magic happens when simple ingredients meet expert techniques, creating a sensory experience that lingers long after the first bite.
Seasoned and grilled to perfection, this corn elevates any outdoor meal with its irresistible appeal.
Vibrant and bold, the dish captures the essence of warm-weather celebrations with minimal effort and maximum flavor.
Fancy Grilled Corn on the Cob
Key Ingredients for Grilled Corn on the Cob
Fresh Produce:Seasoning and Spices:Cooking Ingredients:How to Make the Best Grilled Corn on the Cob
Step 1: Fire Up The Grill
Preheat your grill to high heat, giving it about 10 minutes to reach maximum temperature for perfect grilling.
Step 2: Brush Corn With Oil
Grab each ear of corn and use a basting brush to evenly coat with olive oil, ensuring a smooth and shiny surface.
Step 3: Grill To Perfection
Place corn directly on hot grill grates, turning occasionally to create beautiful char marks. Aim for about 10 minutes total cooking time, rotating for even browning.
Step 4: Remove Carefully
Using tongs, transfer grilled corn from the grill to a serving platter, being cautious of hot surfaces.
Step 5: Add Zesty Flavor Boost
Optional flavor enhancers:Squeeze lime juice over corn, sprinkle Aleppo pepper, and add a light salt touch to elevate the taste.
Step 6: Serve Immediately
Plate the corn while it’s piping hot and enjoy the smoky, charred goodness right away for the best taste experience.
Tips for Grilling Perfect Corn on the Cob
Storing and Reheating Grilled Corn on the Cob
Pairing Grilled Corn with Your Favorite Dishes
Variations of Grilled Corn on the Cob
Print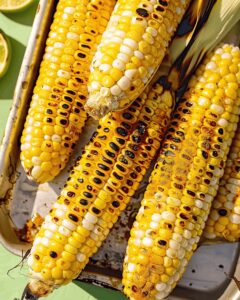
Fancy Grilled Corn On The Cob Recipe
- Total Time: 15 minutes
- Yield: 6 1x
Description
Mexican street corn explodes with zesty flavor, combining grilled sweet corn, tangy lime, and creamy cotija cheese. Spicy chili powder and fresh cilantro elevate this irresistible summer classic that you’ll crave at every backyard barbecue.
Ingredients
Main Ingredients:
- 6 ears of corn, husks and silk removed
Seasoning:
- 2 tablespoons extra virgin olive oil
- 1 tablespoon kosher salt
Garnish:
- 1 lime, halved
- 1 teaspoon Aleppo pepper (or red pepper flakes)
Instructions
- Prepare a high-heat grill, allowing it to warm up for approximately 10 minutes until the temperature is consistent and ideal for grilling.
- Using a culinary brush, meticulously coat each corn ear with extra virgin olive oil, ensuring a uniform and light coverage that will enhance caramelization.
- Carefully place the olive oil-brushed corn directly onto the searing hot grill grates, positioning them strategically for optimal heat exposure.
- Rotate the corn ears every 2-3 minutes, creating beautiful charred marks and promoting even cooking across all surfaces of the kernels.
- Monitor the corn for approximately 10 minutes total, watching for a golden-brown exterior and slight blistering that indicates perfect caramelization.
- Using heat-resistant tongs, gently transfer the grilled corn from the grill onto a serving platter, avoiding potential burns.
- For a zesty flavor enhancement, squeeze fresh lime juice (approximately 1/2 lime per 2 ears of corn) over the hot grilled corn.
- Sprinkle Aleppo pepper flakes generously across the corn, distributing the spice evenly for a balanced, warm heat.
- Finish with a light dusting of kosher salt (about per ear) to heighten the corn’s natural sweetness and complement the smoky grilled flavor.
- Serve immediately while the corn remains piping hot, ensuring the most enjoyable taste and texture.
Notes
- Perfect for summer cookouts and backyard gatherings with friends and family.
- Grilling brings out the corn’s natural sweetness, creating a caramelized and smoky flavor profile.
- Olive oil helps prevent sticking and ensures a beautiful golden-brown char on each ear.
- Turning the corn frequently guarantees even cooking and prevents burning or undercooking.
- Aleppo pepper adds a gentle, warm heat that complements the corn’s natural sweetness.
- Fresh lime juice brightens the dish, cutting through the richness and adding a zesty tang.
- Prep Time: 5 minutes
- Cook Time: 10 minutes
- Category: Appetizer, Snacks
- Method: Grilling
- Cuisine: Mediterranean
Nutrition
- Serving Size: 6
- Calories: 70 kcal
- Sugar: 1 g
- Sodium: 5 mg
- Fat: 3 g
- Saturated Fat: 0.5 g
- Unsaturated Fat: 2.5 g
- Trans Fat: 0 g
- Carbohydrates: 15 g
- Fiber: 2 g
- Protein: 3 g
- Cholesterol: 0 mg
Mary Ellen
Founder, Pastry Chef & Recipe Developer
Expertise
Education
Savannah Technical College
Mary Ellen is the heart and soul of thatsmyhome.com. As the founder, pastry chef, and recipe developer, she refined her skills at Savannah Technical College with an Associate of Applied Science in Culinary Baking & Pastry Arts.
Mary blends classic techniques with modern twists to make artisanal breads, beautifully crafted pastries, and desserts full of unique flavor. Her passion is evident in every recipe, and she enjoys sharing her expertise through hands-on pastry workshops and insightful articles in local culinary magazines.