
The Dreamiest S’mores Delight Pie Recipe for Happy Campers
Summer nights spark pure magic when this s’mores delight pie recipe comes alive with gooey marshmallows and rich chocolate.
Graham cracker crusts whisper nostalgia from childhood campfires.
Decadent layers meld together like sweet memories of outdoor adventures.
Chocolate melts smoothly against toasted marshmallow peaks.
Each slice promises a delightful journey through classic flavor combinations.
Grab your skillet and baking tools – this dessert will become your new weekend favorite.
Quick Recipe Overview
S’mores Pie Ingredient
For Base and Structure:For Sweetness and Binding:For Filling and Topping:Tools That Help Build S’mores Pie
How to Bake the Perfect S’mores Pie
Warm up your kitchen and gather all the delightful ingredients for a sweet adventure. Prepare your baking space with love and excitement, ensuring everything is within easy reach.
Mix softened butter and sugar in a bowl, creating a creamy base that promises deliciousness. Gently fold in flour and graham cracker crumbs until a tender dough forms that whispers of campfire memories.
Spread two-thirds of the dough across your pie pan, creating a rustic base that hints at the yumminess to come. Press the dough carefully to form a smooth, inviting foundation.
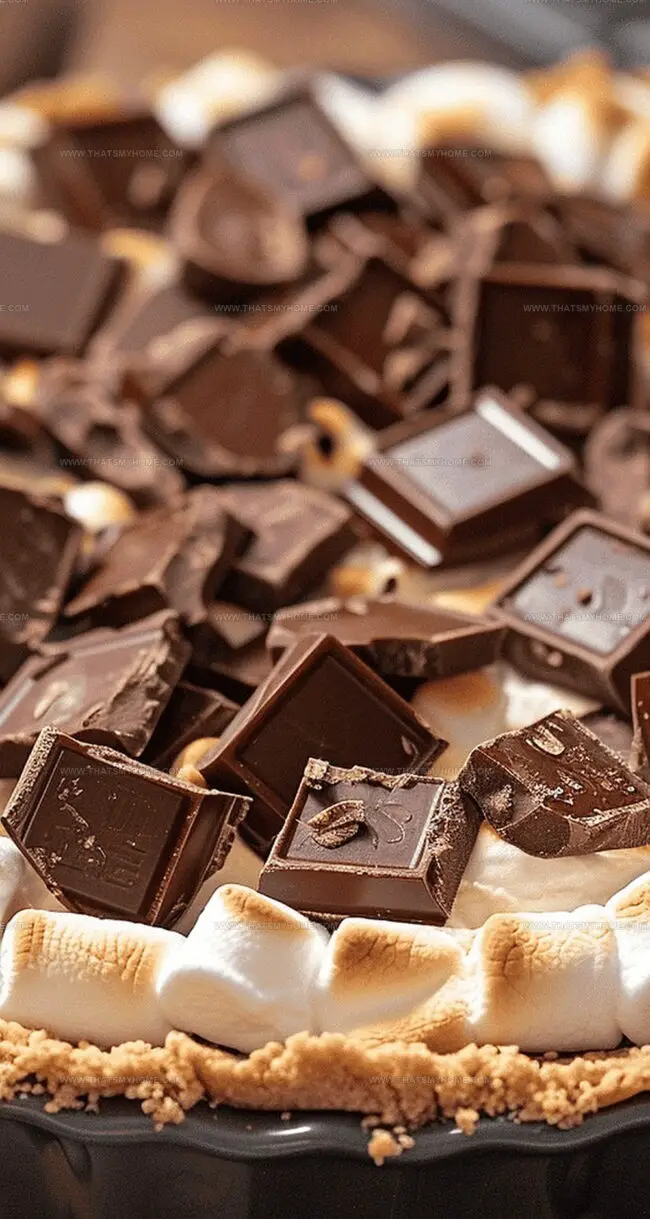
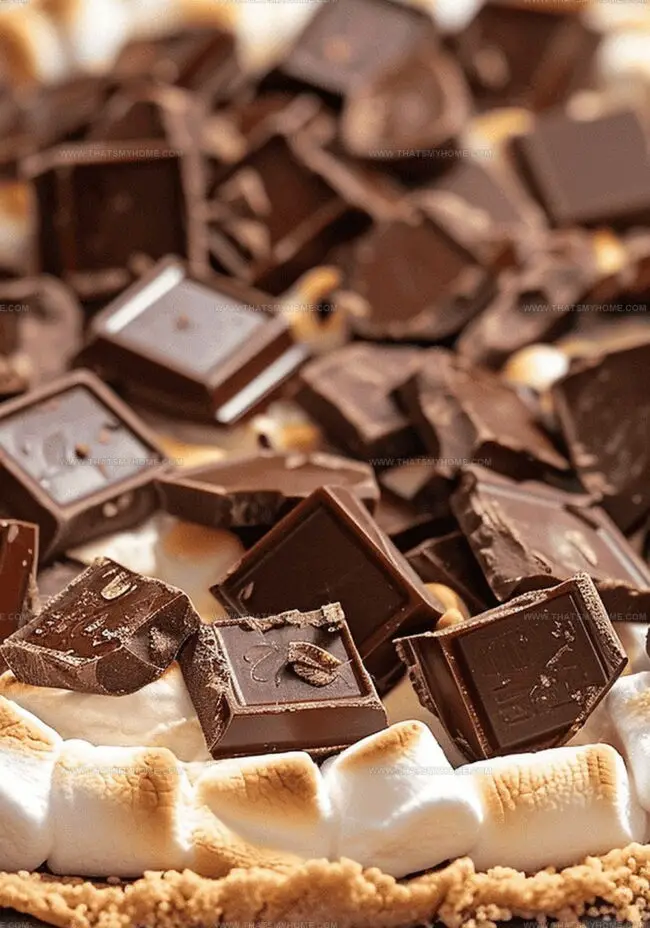
Layer marshmallow creme across the dough like a fluffy cloud. Arrange chocolate bars on top, creating a decadent landscape of sweet possibilities.
Scatter mini marshmallows over the chocolate, allowing them to peek through like tiny pillows of sweetness. Gently place remaining dough pieces across the top for a playful, rustic finish.
Bake in a preheated oven until the top turns a beautiful golden brown. Watch carefully as your creation transforms into a mouthwatering masterpiece that speaks of summer nights and happy memories.
Allow your pie to cool on a wire rack, letting the flavors meld and settle. Slice and serve, revealing layers of gooey, chocolatey, marshmallow wonder that will make taste buds dance with joy.
Topping Tips for S’mores That Pops
Serving S’mores Pie Warm or Chilled
Storing S’mores Pie for Gooey Results Later
Print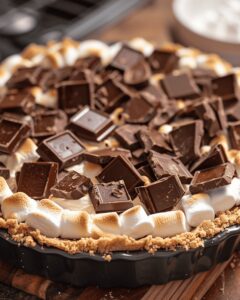
Gooey Smores Delight Pie Recipe
- Total Time: 45 minutes
- Yield: 9 1x
Description
Gooey marshmallow and chocolate merge in this s’mores delight pie, creating a nostalgic campfire-inspired dessert. Graham cracker crust and rich chocolate filling promise sweet memories with each luxurious slice you’ll savor.
Ingredients
- 1 cup graham cracker crumbs
- 1 cup all-purpose flour
- ½ cup white sugar
- 1 tsp baking powder
- ½ cup (1 stick) unsalted butter, softened
- 1 large egg
- 1 tsp vanilla extract
- 4 whole 1.55 oz (44 g) Hershey’s chocolate bars, unwrapped
- 1 cup marshmallow creme
- 1 cup mini marshmallows
Instructions
- Preparation: Warm the oven to 350°F (177°C) and generously spray a 9-inch pie pan with non-stick coating.
- Mixing Base: Whip softened butter and white sugar into a light, airy cream, then seamlessly blend in egg and vanilla extract until the mixture becomes silky and uniform.
- Dough Formation: Delicately fold graham cracker crumbs, flour, and baking powder into the wet ingredients, stirring minimally to maintain a tender texture.
- Crust Assembly: Press approximately two-thirds of the dough into the pie pan, crafting an even layer that thoroughly covers the bottom and sides.
- Layering Fillings: Spread marshmallow creme uniformly across the dough base, then arrange chocolate bars to cover the surface completely, followed by a generous scattering of mini marshmallows.
- Topping Technique: Craft irregular dough disks and distribute them loosely over the marshmallow layer, allowing some marshmallows to peek through for a rustic aesthetic.
- Baking Process: Slide the pie into the preheated oven and bake for 15-20 minutes, watching carefully to achieve a golden-brown finish without scorching.
- Cooling Stage: Transfer the pie to a wire rack and allow it to cool thoroughly, enabling the filling to set and the dessert’s structure to stabilize.
Notes
- Prevent Dough Sticking: Generously spray the pie pan with non-stick baking spray to guarantee effortless pie removal without damaging the delicate crust.
- Mix Ingredients Gently: Fold dry ingredients into wet mixture just until combined to maintain a tender, soft texture and prevent dense, tough dough.
- Watch Baking Time Carefully: Monitor pie closely during the 15-20 minute baking window to achieve perfect golden-brown color without burning marshmallows or chocolate.
- Cooling is Crucial: Allow pie to cool completely on a wire rack, which helps set the filling and allows flavors to meld together for optimal taste and texture.
- Prep Time: 30 minutes
- Cook Time: 15 minutes
- Category: Desserts, Snacks
- Method: Baking
- Cuisine: American
Nutrition
- Serving Size: 9
- Calories: 319
- Sugar: 21 g
- Sodium: 135 mg
- Fat: 15 g
- Saturated Fat: 9 g
- Unsaturated Fat: 6 g
- Trans Fat: 0 g
- Carbohydrates: 43 g
- Fiber: 1 g
- Protein: 3 g
- Cholesterol: 34 mg
Michael Rivera
Co-Founder & Culinary Instructor
Expertise
Education
The French Culinary Institute (now part of the International Culinary Center)
Michael Rivera is a seasoned chef and culinary instructor based in San Francisco, CA. Trained in Classic Culinary Arts at The French Culinary Institute, he refined his skills in Michelin-starred kitchens, mastering classic French techniques and artisanal bread baking.
Passionate about making gourmet methods accessible, Michael co-founded thatsmyhome.com to share his expertise through interactive online lessons and innovative, plant-based recipes. He loves blending traditional techniques with modern ideas, encouraging home cooks to enjoy the art of cooking in a relaxed, fun environment.