
The Perfect Japanese Milk Bread Recipe: Soft, Fluffy Homemade Bliss
Japanese milk bread represents the pinnacle of bakery perfection, where delicate crumb meets incredible softness.
Unique techniques elevate ordinary ingredients into an extraordinary culinary experience that defies typical bread expectations.
Bakers cherish this remarkable creation for its cloud-like consistency and gentle flavor profile.
Delicate strands of gluten create an almost supernatural texture that feels like edible silk.
Each slice promises a remarkable sensory journey through carefully crafted techniques passed down through generations.
Rich dairy notes enhance the bread inherent charm, providing a subtle sweetness that lingers delightfully.
Prepare to embark on a baking adventure that will revolutionize your understanding of bread potential.
Light & Fluffy Japanese Milk Bread: A Soft, Sweet Delight
Key Ingredients for Light & Fluffy Japanese Milk Bread
Flour and Dry Ingredients:Liquid and Leavening Ingredients:Fat and Enriching Ingredients:How to Make Light & Fluffy Japanese Milk Bread
Step 1: Prepare Butter
Unwrap butter and let it sit at room temperature to soften naturally.
Step 2: Create Tangzhong Base
Whisk flour and water in a small saucepan, cooking until mixture becomes thick and paste-like. Set aside to cool completely.
Step 3: Activate Yeast
Warm milk to 100°F and sprinkle yeast over the surface. Let sit until mixture becomes foamy and fragrant, about 5-10 minutes.
Step 4: Combine Dry Ingredients
In a large mixing bowl, blend:Step 5: Mix Wet Ingredients
Combine:Stir until well integrated.
Step 6: Create Dough
Gradually add dry ingredients to wet mixture. Mix until a shaggy dough forms. Knead thoroughly, incorporating softened butter until smooth and elastic.
Step 7: First Rise
Place dough in a buttered bowl. Cover with plastic wrap and let rise in a warm spot until doubled in size, about 1 hour.
Step 8: Shape Bread
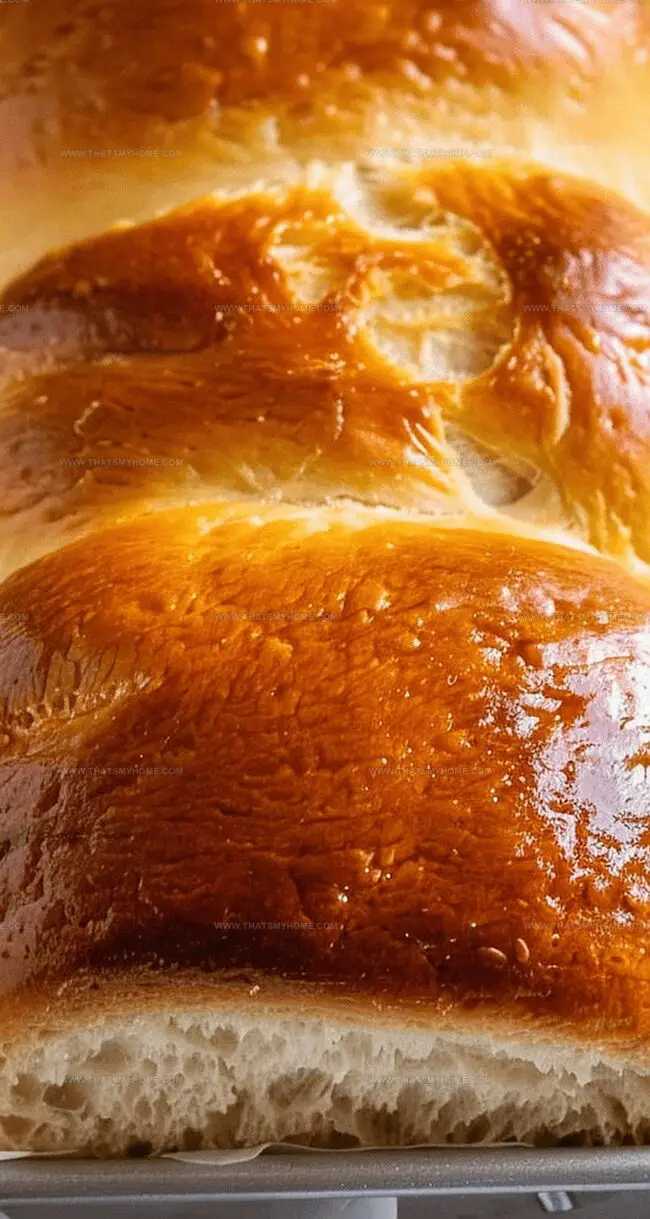
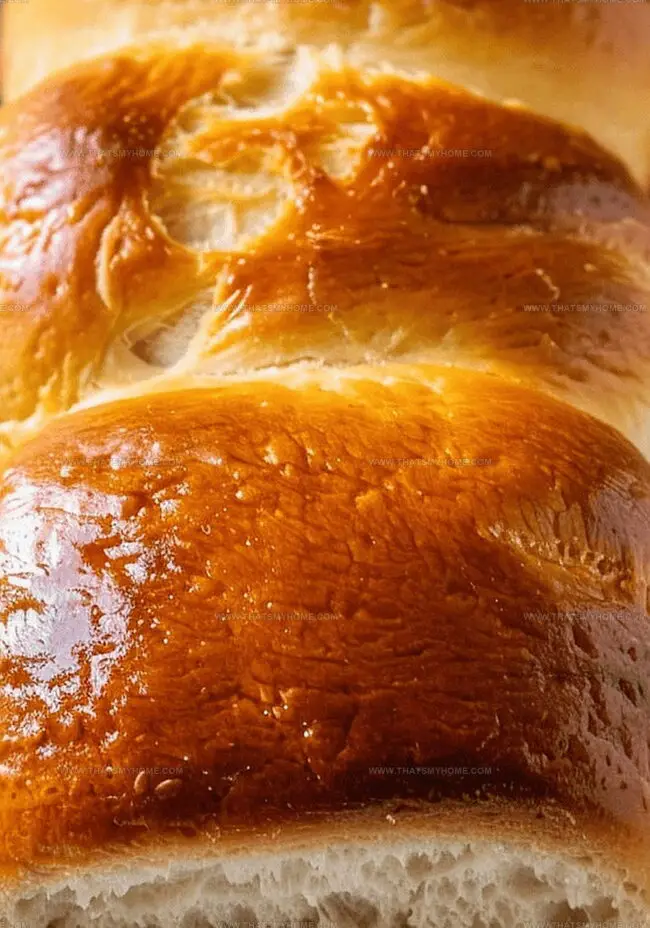
Divide dough into 4 equal portions. Roll each piece into a coil and arrange in a prepared loaf pan.
Step 9: Second Rise
Cover and let dough rise again until puffy, about 45 minutes.
Step 10: Prepare for Baking
Preheat oven to 350°F. Gently brush dough surface with egg wash.
Step 11: Bake Bread
Bake for 25-30 minutes until golden brown and sounds hollow when tapped.
Step 12: Cool and Serve
Remove from oven and let cool in pan for 10 minutes. Transfer to wire rack and cool completely for at least 30 minutes before slicing.
Tips for Perfect Light & Fluffy Japanese Milk Bread
Storing and Reheating Light & Fluffy Japanese Milk Bread
Pairing Light & Fluffy Japanese Milk Bread with Butter
Creative Variations of Light & Fluffy Japanese Milk Bread
Print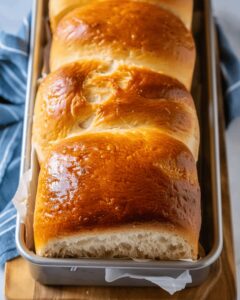
Japanese Milk Bread Recipe
- Total Time: 45 minutes
- Yield: 1 1x
Description
Silky Japanese milk bread promises pure comfort with its pillowy texture and rich, buttery flavor. Home bakers can craft this delicate loaf using simple ingredients and traditional Japanese techniques for an irresistible bakery-style treat you’ll crave again and again.
Ingredients
Main Dry Ingredients:
- 2 cups plus 2 tablespoons (255 grams) bread flour
- 1 ½ teaspoons kosher salt
- 2 tablespoons (25 grams) granulated sugar
Wet Ingredients and Activators:
- ½ cup (120 milliliters) whole milk
- ¼ cup plus 2 tablespoons (90 milliliters) water
- ⅓ cup (80 milliliters) heavy cream
- 2 large eggs, divided
- 2 tablespoons (28 grams) unsalted butter
- 1 ½ teaspoons active dry yeast
Optional Finishing Ingredient:
- Flaky salt
Instructions
- Prepare a water-roux paste by whisking flour and water in a small saucepan over low heat until a thick, smooth mixture develops; set aside to cool completely.
- Activate the yeast by warming milk to 100°F (37.8°C) and stirring in the dry yeast, allowing it to bloom and become frothy for approximately 5-10 minutes.
- In a large mixing bowl, combine bread flour, granulated sugar, and kosher salt, creating a dry ingredient foundation.
- Whisk together the activated yeast mixture, heavy cream, large egg, and cooled water-roux paste until thoroughly integrated.
- Gradually incorporate the dry ingredients into the wet mixture, stirring until a shaggy, uneven dough begins to form.
- Transfer the dough to a clean work surface and knead vigorously for 10-12 minutes, gradually working in the softened butter until the dough becomes smooth, elastic, and slightly glossy.
- Place the kneaded dough in a generously buttered bowl, cover with a clean kitchen towel, and allow to rise in a warm, draft-free area until it doubles in volume, approximately 1-1.5 hours.
- Punch down the risen dough and divide it into four equal portions, gently rolling each piece into a smooth coil.
- Arrange the dough coils side by side in a greased 9×5-inch (23×13-cm) loaf pan, ensuring even spacing.
- Cover the loaf pan and permit a second rise until the dough has noticeably expanded, roughly 45-60 minutes.
- Preheat the oven to 350°F (175°C) and delicately brush the surface with an egg wash for a golden, glossy finish.
- Bake the bread for 25-30 minutes, rotating the pan halfway through to ensure uniform browning.
- Remove from the oven and let the bread cool in the pan for 10 minutes before transferring to a wire rack to cool completely for at least 30 minutes before slicing.
Notes
- Roux technique ensures incredible softness by pre-cooking flour and water, creating a magical texture that traps moisture.
- Gentle kneading develops gluten slowly, transforming shaggy dough into silky, elastic perfection without overworking.
- Temperature matters critically – warm milk activates yeast precisely, while room-temperature butter blends seamlessly into dough.
- Folding and shaping technique creates beautiful spiral layers that pull apart effortlessly when baked.
- Egg wash provides gorgeous golden-brown crust, adding professional bakery-style shine and delicate crispness.
- Prep Time: 20 minutes
- Cook Time: 25 minutes
- Category: Breakfast, Snacks
- Method: Baking
- Cuisine: Japanese
Nutrition
- Serving Size: 1
- Calories: 450 kcal
- Sugar: 6g
- Sodium: 700mg
- Fat: 24g
- Saturated Fat: 14g
- Unsaturated Fat: 8g
- Trans Fat: 0g
- Carbohydrates: 46g
- Fiber: 2g
- Protein: 12g
- Cholesterol: 140mg
Mary Ellen
Founder, Pastry Chef & Recipe Developer
Expertise
Education
Savannah Technical College
Mary Ellen is the heart and soul of thatsmyhome.com. As the founder, pastry chef, and recipe developer, she refined her skills at Savannah Technical College with an Associate of Applied Science in Culinary Baking & Pastry Arts.
Mary blends classic techniques with modern twists to make artisanal breads, beautifully crafted pastries, and desserts full of unique flavor. Her passion is evident in every recipe, and she enjoys sharing her expertise through hands-on pastry workshops and insightful articles in local culinary magazines.