No-Bake Unicorn Cheesecake Recipe

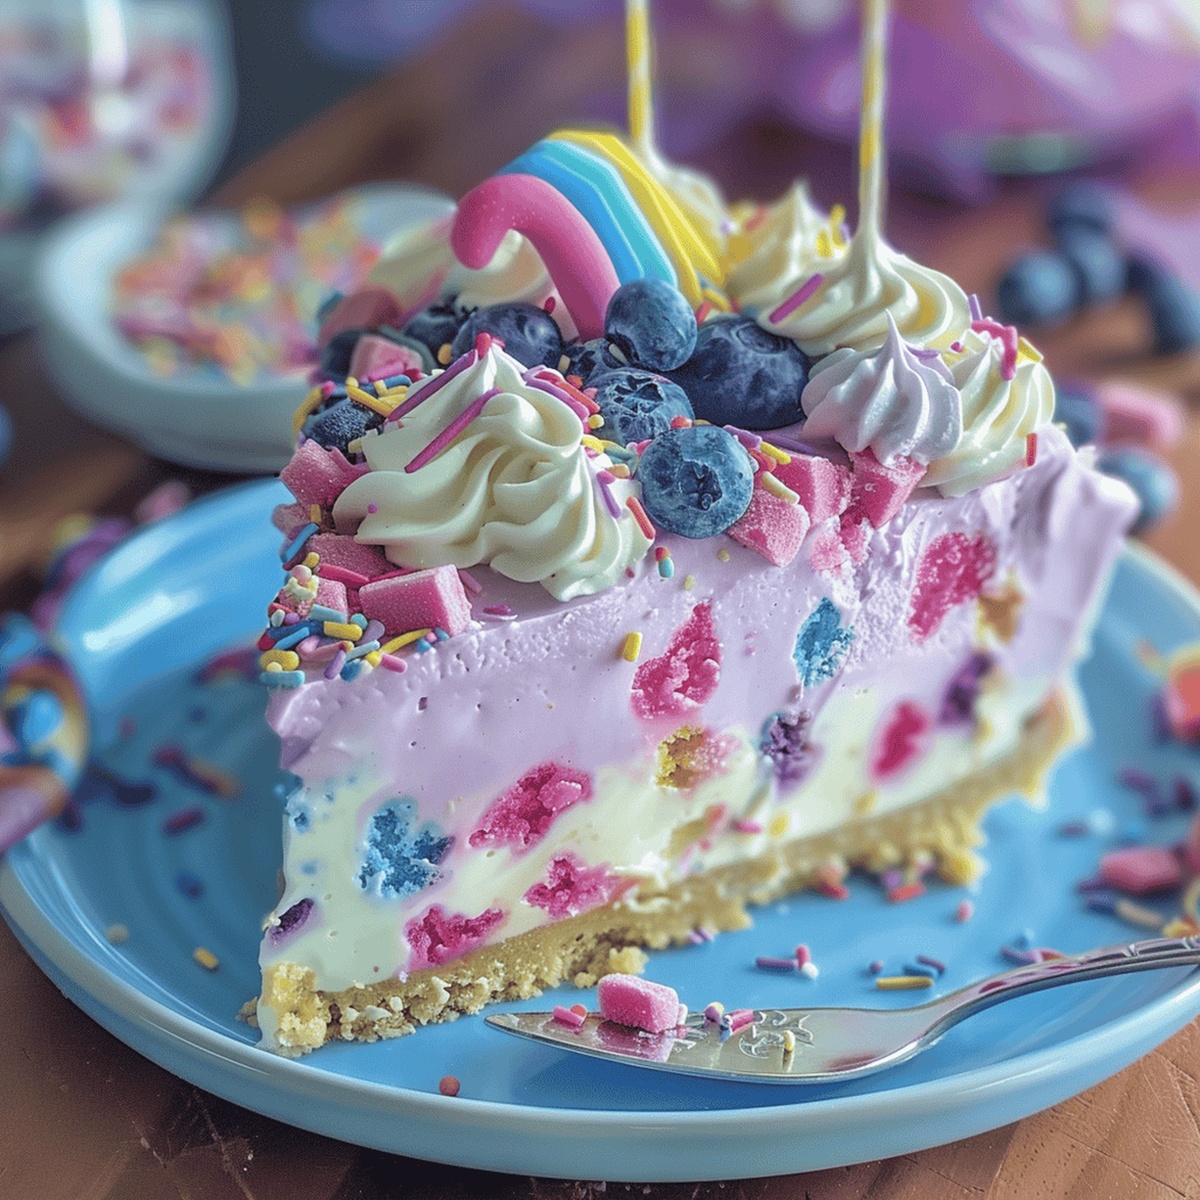
The Perfect No-Bake Unicorn Cheesecake Recipe: Magical & Simple

No-bake unicorn cheesecake enhances ordinary dessert moments into magical culinary adventures.

Whimsical colors dance through each delectable layer, creating a visual feast that captures imagination.

Sweet and creamy textures blend seamlessly, promising an indulgent experience for dessert enthusiasts.

Kitchen novices and seasoned bakers alike can craft this stunning treat without stress or complicated techniques.

Pastel hues and dreamy swirls make this confection a showstopper at any gathering.

Light, refreshing, and utterly enchanting, this dessert breaks traditional recipe boundaries with its playful approach.

Prepare to fall in love with a confection that delivers pure joy.

Why You’ll Love No-Bake Unicorn Cheesecake

  • Swirl Spectacular Colors: Transform a classic dessert into a magical, visually stunning treat with vibrant food coloring that creates a mesmerizing rainbow effect, perfect for delighting both kids and adults.
  • No-Bake Bliss: Enjoy an effortless dessert that requires zero oven time, making it ideal for busy home bakers or those intimidated by complex baking techniques – just mix, chill, and serve.
  • Creamy Texture Heaven: Experience a luxuriously smooth and rich cheesecake filling that combines cream cheese, whipped cream, and sour cream for an incredibly velvety, melt-in-your-mouth sensation that's both indulgent and refreshing.

Key Ingredients for No-Bake Unicorn Cheesecake

Crust Ingredients:
  • Graham Crackers, Oreo Cookies: Crisp base for the cheesecake with rich, sweet flavor. Choose fresh, crunchy cookies for the best texture.
  • Butter: Helps bind the crust and adds richness. Unsalted butter works best for controlling saltiness.
  • Powdered Sugar: Provides sweetness and helps hold the crust together. Fine texture ensures smooth mixing.
  • Salt: Enhances overall flavor and balances sweetness.
Filling Ingredients:
  • Cream Cheese: Main component of cheesecake, creating creamy and smooth texture. Full-fat version recommended for best results.
  • Sugar: Sweetens the filling and helps create smooth consistency. Granulated white sugar works perfectly.
  • Sour Cream: Adds tanginess and extra creaminess to the cheesecake. Choose full-fat version for richness.
  • Whipped Cream: Provides light, airy texture to the filling. Freshly whipped cream preferred over store-bought.
  • Vanilla Extract: Adds depth of flavor and classic cheesecake taste. Pure vanilla extract gives best results.
  • Lemon Zest, Lemon Juice: Brightens the flavor and adds subtle citrus notes. Fresh lemons recommended.
  • Salt: Balances and enhances overall flavor profile.
Decorative Ingredients:
  • Food Coloring: Creates vibrant, unicorn-inspired colors. Gel food coloring provides more intense hues.

How to Make No-Bake Unicorn Cheesecake

Step 1: Prepare The Magical Crust

Grab your graham crackers and crush them into fine crumbs. Mix the crumbs with:
  • Melted butter
  • Powdered sugar
  • Pinch of salt

Press this sparkly mixture firmly into a tart pan, making sure to cover the bottom and sides evenly. Pop the crust into the freezer for 30 minutes to set and become rock solid.

Step 2: Create The Dreamy Filling

In a large mixing bowl, whip up your creamy base by blending:
  • Cream cheese
  • Sugar
  • Lemon zest
  • Lemon juice
  • Vanilla extract
  • Dash of salt

Beat these ingredients until they become silky smooth. Gently fold in sour cream, creating a luscious texture. Next, incorporate whipped cream for extra lightness.

Step 3: Add Magical Colors

Divide the filling into separate bowls. Carefully tint each portion with different food colors – think pastel pinks, soft blues, lavender, and mint green. This is where the unicorn magic happens!

Step 4: Swirl And Chill

Pour the colorful fillings into your prepared crust. Use a butter knife or toothpick to create mesmerizing swirls, blending the colors gently. Cover the cheesecake and refrigerate overnight, allowing the flavors to dance and meld together.

Step 5: Serve And Enjoy

Remove from refrigerator, slice, and indulge in your no-bake unicorn cheesecake masterpiece!

Tips for Perfect No-Bake Unicorn Cheesecake

  • Crush Cookies Perfectly: Use a food processor or rolling pin to create fine, even cookie crumbs for a smooth, compact crust that holds together beautifully.
  • Chill Crust Completely: Ensure the crust is rock-solid frozen before adding filling to prevent crumbling and maintain a crisp base.
  • Whip Cream Carefully: Beat cream to soft peaks for the lightest, most delicate cheesecake texture that folds seamlessly into the cream cheese mixture.
  • Color with Precision: Use gel food coloring for vibrant, concentrated colors that create stunning swirl patterns without watering down the filling.
  • Swirl Like a Pro: Drag a butter knife or toothpick gently through colored layers to create magical, marbled effects without over-mixing the colors.

Storing and Reheating No-Bake Unicorn Cheesecake

  • Refrigerate the cheesecake in an airtight container to maintain its freshness. Place plastic wrap directly on the surface to prevent moisture and protect the delicate colors from fading. Store the cheesecake in the refrigerator for up to 5 days, keeping it away from strong-smelling foods that might affect its delicate flavor.
  • Freezing works perfectly for longer storage. Wrap the entire cheesecake tightly in plastic wrap, then cover with aluminum foil to prevent freezer burn. Freeze for up to 2 months, ensuring you label the container with the date. Thaw overnight in the refrigerator before serving, which helps preserve the creamy texture and vibrant swirled colors.
  • Reheating isn't recommended for this no-bake dessert.

Pairing No-Bake Unicorn Cheesecake with Desserts

  • Pair with Pastel Cocktails: Serve this whimsical cheesecake alongside light, colorful cocktails like lavender gin fizz or strawberry champagne that match its playful unicorn aesthetic and complement its creamy texture.
  • Combine with Fresh Berries: Add a vibrant mixed berry compote or fresh raspberry coulis on the side to enhance the dessert's tartness and provide a natural fruity contrast to the rich cheesecake.
  • Serve with Sparkling Rosé: Select a chilled, slightly sweet sparkling rosé that echoes the cake's soft color palette and cuts through its creamy richness, creating a delightful dessert experience.
  • Match with Vanilla Bean Ice Cream: Offer a scoop of classic vanilla bean ice cream alongside the cheesecake to amplify its smooth, cool characteristics and provide a complementary neutral backdrop to the colorful dessert.

Fun Variations of No-Bake Unicorn Cheesecake

  • Rainbow Swirl Sensation: Enhance color variation by using pastel food coloring shades like lavender, mint green, soft pink, and sky blue for a gentler unicorn-inspired palette.
  • Chocolate Cookie Crunch: Replace regular cookie crumbs with chocolate cookie crumbs and add crushed chocolate chips into the crust for extra textural depth and rich chocolate undertones.
  • Fruity Fusion Edition: Incorporate fresh fruit purees like strawberry or raspberry into specific color sections of the filling, creating natural color gradients and adding subtle fruity notes to complement the creamy cheesecake base.
  • Glittery Magical Version: Sprinkle edible pearl dust or shimmer powder between color layers to create a magical, sparkling effect that mimics unicorn-inspired aesthetics and adds an elegant touch to the dessert.
Print
clock clock iconcutlery cutlery iconflag flag iconfolder folder iconinstagram instagram iconpinterest pinterest iconfacebook facebook iconprint print iconsquares squares iconheart heart iconheart solid heart solid icon
No-Bake Unicorn Cheesecake Recipe

No-Bake Unicorn Cheesecake Recipe


5 Stars 4 Stars 3 Stars 2 Stars 1 Star

4.6 from 40 reviews

  • Total Time: 30 minutes
  • Yield: 8 1x

Description

Magical No-Bake Unicorn Cheesecake brings whimsical pastel colors and playful sprinkles to classic dessert lovers. Creamy layers and dreamy decorations make this sweet treat perfect for celebrations when you want something extraordinary and enchanting.


Ingredients

Scale

Primary Ingredients:

  • 2 packages (16 ounces / 454 grams) cream cheese, at room temperature
  • 1 cup (240 milliliters) heavy cream
  • ½ cup (100 grams) sugar
  • ¼ cup (60 milliliters) sour cream or labneh

Flavor and Seasoning Ingredients:

  • Zest and juice of 1 lemon
  • 1 tablespoon pure vanilla extract
  • ½ teaspoon salt

Decoration Ingredients:

  • Purple, fuchsia, and teal food colorings
  • Edible glitter
  • Additional powdered sugar (as needed to adjust thickness)

Instructions

  1. Crush graham crackers into fine crumbs and mix thoroughly with melted butter, powdered sugar, and a pinch of salt. Distribute the mixture evenly across the bottom and up the sides of a 9-inch (23 centimeters) tart pan, pressing firmly to create a compact base. Chill the crust in the freezer for 30-40 minutes until completely firm.
  2. Using an electric mixer, whip cream cheese until smooth and velvety. Gradually incorporate granulated sugar, freshly grated lemon zest, lemon juice, pure vanilla extract, and a subtle hint of salt. Continue mixing until the texture becomes silky and uniform.
  3. Fold in sour cream, ensuring complete integration without overmixing. Gently incorporate whipped heavy cream, maintaining a light and airy consistency.
  4. Separate the cheesecake filling into three distinct bowls. Add vibrant food coloring to each portion – select pastel pink, lavender, and sky blue shades to create the whimsical unicorn effect.
  5. Carefully pour the colored fillings into the chilled crust, alternating colors and creating a marbled pattern. Use a thin butter knife or wooden skewer to delicately swirl the colors together, creating soft, dreamy transitions.
  6. Cover the cheesecake with plastic wrap and refrigerate for 8-12 hours, allowing the filling to set completely and flavors to meld. Remove from refrigerator 10 minutes before serving for optimal texture.

Notes

Recipe Card Notes:

  • Unleash your inner pastry artist by creating swirls that transform this dessert into a magical unicorn masterpiece.
  • Chilling overnight allows flavors to meld and creates a silky smooth texture that melts in your mouth.
  • Kids and adults will go crazy for the vibrant rainbow colors that make this cheesecake a showstopping treat.
  • Prepare the crust ahead of time to ensure a firm, crisp base that holds the dreamy filling perfectly.
  • Experiment with different food coloring combinations to personalize your unicorn cheesecake and make it uniquely yours.
  • Prep Time: 30 minutes
  • Cook Time: 0 minutes
  • Category: Desserts, Snacks
  • Method: None
  • Cuisine: American

Nutrition

  • Serving Size: 8
  • Calories: 440 kcal
  • Sugar: 20g
  • Sodium: 300mg
  • Fat: 38g
  • Saturated Fat: 23g
  • Unsaturated Fat: 15g
  • Trans Fat: 0g
  • Carbohydrates: 29g
  • Fiber: <1g
  • Protein: 6g
  • Cholesterol: 120mg
Mary Ellen

Mary Ellen

Founder, Pastry Chef & Recipe Developer

Expertise

  • Artisanal Bread Making
  • Exquisite Pastry Craftsmanship
  • Creative Dessert Presentation
  • Flavor Profile Development
  • Menu Concept Innovation.

Education

Savannah Technical College

  • Program: Associate of Applied Science in Culinary Baking & Pastry Arts
  • Focus: A specialized program focusing on baking and pastry fundamentals, including bread making, cake decorating, and advanced pastry techniques. Developed creative presentation skills and an understanding of ingredient functions through lab-based practice.

Mary Ellen is the heart and soul of thatsmyhome.com. As the founder, pastry chef, and recipe developer, she refined her skills at Savannah Technical College with an Associate of Applied Science in Culinary Baking & Pastry Arts. 

Mary blends classic techniques with modern twists to make artisanal breads, beautifully crafted pastries, and desserts full of unique flavor. Her passion is evident in every recipe, and she enjoys sharing her expertise through hands-on pastry workshops and insightful articles in local culinary magazines.

Leave a Reply

Your email address will not be published. Required fields are marked *

Recipe rating 5 Stars 4 Stars 3 Stars 2 Stars 1 Star