
Savory Fall Bliss: Homemade Pumpkin and Gouda Pizza Recipe
When autumn’s crisp breeze rolls in, nothing beats a slice of homemade pumpkin and gouda pizza that brings warmth to your kitchen.
The rich, creamy gouda melts perfectly alongside sweet pumpkin puree, creating a flavor combination that dances on your taste buds.
Seasonal ingredients shine in this unexpected culinary twist that turns an ordinary meal into something extraordinary.
Savory and slightly sweet notes blend seamlessly across each golden-crusted slice.
The delicate balance of cheese and pumpkin promises a delightful experience for anyone seeking a fresh take on pizza night.
Comfort meets creativity in this simple yet sophisticated recipe that’ll have everyone asking for seconds.
Grab your apron and get ready to surprise your palate with a pizza that redefines autumn dining.
Quick Recipe Overview
Pumpkin and Gouda Pizza: What You’ll Need
For Base:For Toppings and Flavoring:For Finishing and Garnish:Essential Tools for Making Pumpkin and Gouda Pizza
How to Assemble and Bake Pumpkin and Gouda Pizza
Gently heat a skillet and slowly cook onions until they turn a soft golden color. Infuse the onions with minced garlic and a hint of spice during the final moments of cooking. The slow process develops rich, sweet flavors that will make your kitchen smell incredible.
Warm up your oven to create the perfect baking environment. Stretch out your pizza dough on a clean surface, creating a rustic circular shape. Spread a smooth layer of creamy pumpkin puree across the surface, leaving a small border around the edges.
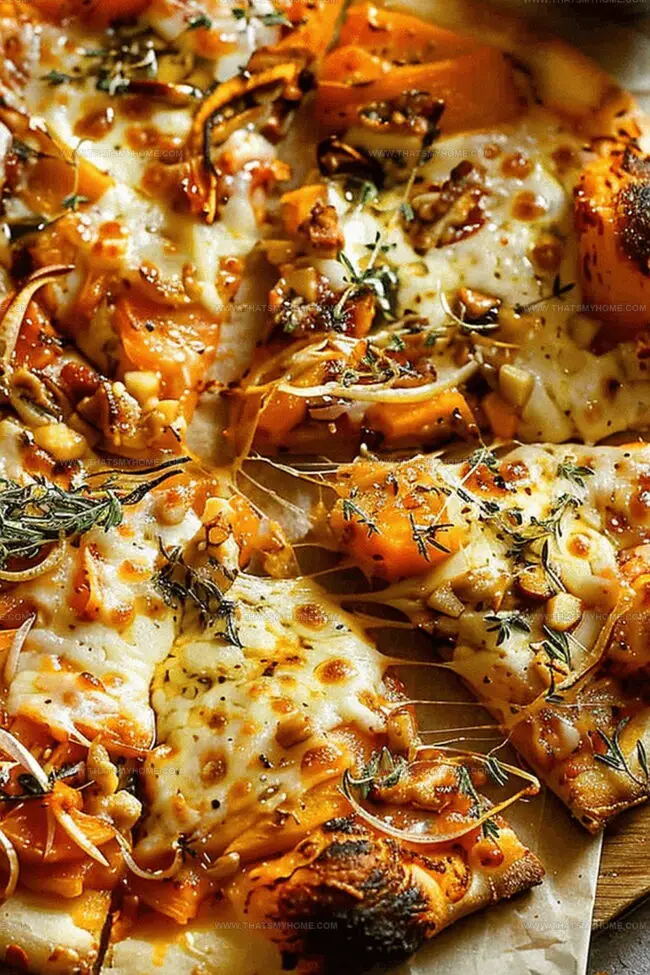
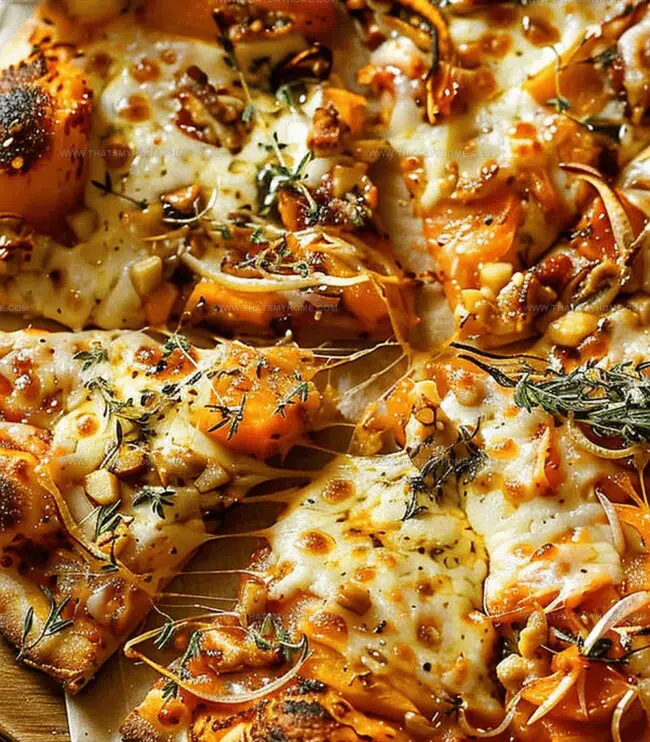
Sprinkle the caramelized onions generously over the pumpkin base. Shower the pizza with crumbled gouda cheese, ensuring an even coverage that will melt into delicious pools of flavor.
Slide the pizza into the hot oven and watch it transform. The crust will crisp up beautifully while the cheese melts into a golden blanket. After about 12 minutes, your pizza will emerge looking like a work of art.
If you’re feeling fancy, garnish with fresh herbs to add a pop of color and extra flavor. Slice and serve immediately while the pizza is at its crispy, melty best.
Tips, Tricks & Flavor Ideas for Pumpkin and Gouda Pizza
Serving Pumpkin and Gouda Pizza
How to Store and Reheat Pumpkin and Gouda Pizza
Print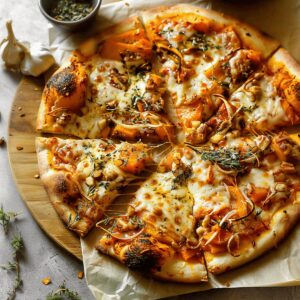
Rustic Pumpkin And Gouda Pizza Recipe
- Total Time: 55 minutes
- Yield: 5 1x
Description
Creamy pumpkin and gouda pizza blends autumn’s warmth with rich cheese and crisp crust. Herbs and caramelized onions elevate this seasonal comfort dish that welcomes you to savor each delicious slice.
Ingredients
- 16 oz (454 g) pizza dough, room temperature
- ¾ cup (177 mL) pumpkin puree, canned
- 5 oz (142 g) gouda cheese, freshly grated (about 1 ¼ cups)
- 1 yellow onion, large, peeled and sliced
- 3–4 garlic cloves, minced
- 2 tbsps (30 mL) extra virgin olive oil
- ½ tsp kosher salt
- ¼–½ tsp red pepper flakes, crushed (optional)
- Parsley, fresh, finely chopped (for garnish)
Instructions
- Caramelize Onions: Heat olive oil in a skillet over medium temperature. Add sliced onions and cook, stirring occasionally, until soft and golden. After 7-8 minutes, reduce heat and continue cooking for 20-30 minutes until deeply caramelized. In the final 5 minutes, mix in minced garlic, kosher salt, and red pepper flakes.
- Prepare Oven: Position rack in center-top position and preheat to 475°F (246°C). Place pizza stone or baking sheet inside to create an intensely hot surface.
- Shape Dough: Flour a work surface and roll pizza dough into a 12-14 inch circle. Transfer to parchment paper and pierce with a fork to prevent excessive bubbling.
- Assemble Pizza: Spread pumpkin puree evenly across dough, leaving a 1/2-inch border. Layer caramelized onions and top with shredded gouda cheese.
- Bake and Finish: Slide pizza onto preheated stone or baking sheet. Bake for 12 minutes until crust turns crisp and golden, and cheese melts completely. Optional: Sprinkle freshly chopped parsley on top before serving.
Notes
- Caramelize Onions Slowly: Low and slow cooking develops deep, sweet flavor; rushing can lead to burnt, bitter onions.
- Prep Pizza Stone Properly: Preheating creates restaurant-quality crispy crust by mimicking professional pizza oven conditions.
- Fork-Poke Dough Technique: Perforating prevents massive air bubbles, ensuring even, flat pizza base during baking.
- Cheese Melting Tip: Shred gouda fresh for optimal melting and most authentic, creamy texture across pizza surface.
- Prep Time: 10 minutes
- Cook Time: 45 minutes
- Category: Lunch, Dinner, Snacks
- Method: Baking
- Cuisine: Italian-American
Nutrition
- Serving Size: 5
- Calories: 390
- Sugar: 3 g
- Sodium: 320 mg
- Fat: 20 g
- Saturated Fat: 9 g
- Unsaturated Fat: 11 g
- Trans Fat: 0 g
- Carbohydrates: 42 g
- Fiber: 3 g
- Protein: 12 g
- Cholesterol: 30 mg
Michael Rivera
Co-Founder & Culinary Instructor
Expertise
Education
The French Culinary Institute (now part of the International Culinary Center)
Michael Rivera is a seasoned chef and culinary instructor based in San Francisco, CA. Trained in Classic Culinary Arts at The French Culinary Institute, he refined his skills in Michelin-starred kitchens, mastering classic French techniques and artisanal bread baking.
Passionate about making gourmet methods accessible, Michael co-founded thatsmyhome.com to share his expertise through interactive online lessons and innovative, plant-based recipes. He loves blending traditional techniques with modern ideas, encouraging home cooks to enjoy the art of cooking in a relaxed, fun environment.