Spicy Kimchi Fried Rice Recipe

Savory Kimchi Fried Rice Recipe: A Speedy Comfort Classic

Sizzling and packed with bold Korean kimchi fried rice that dances with tangy, spicy flavors promises a culinary adventure right in your kitchen.

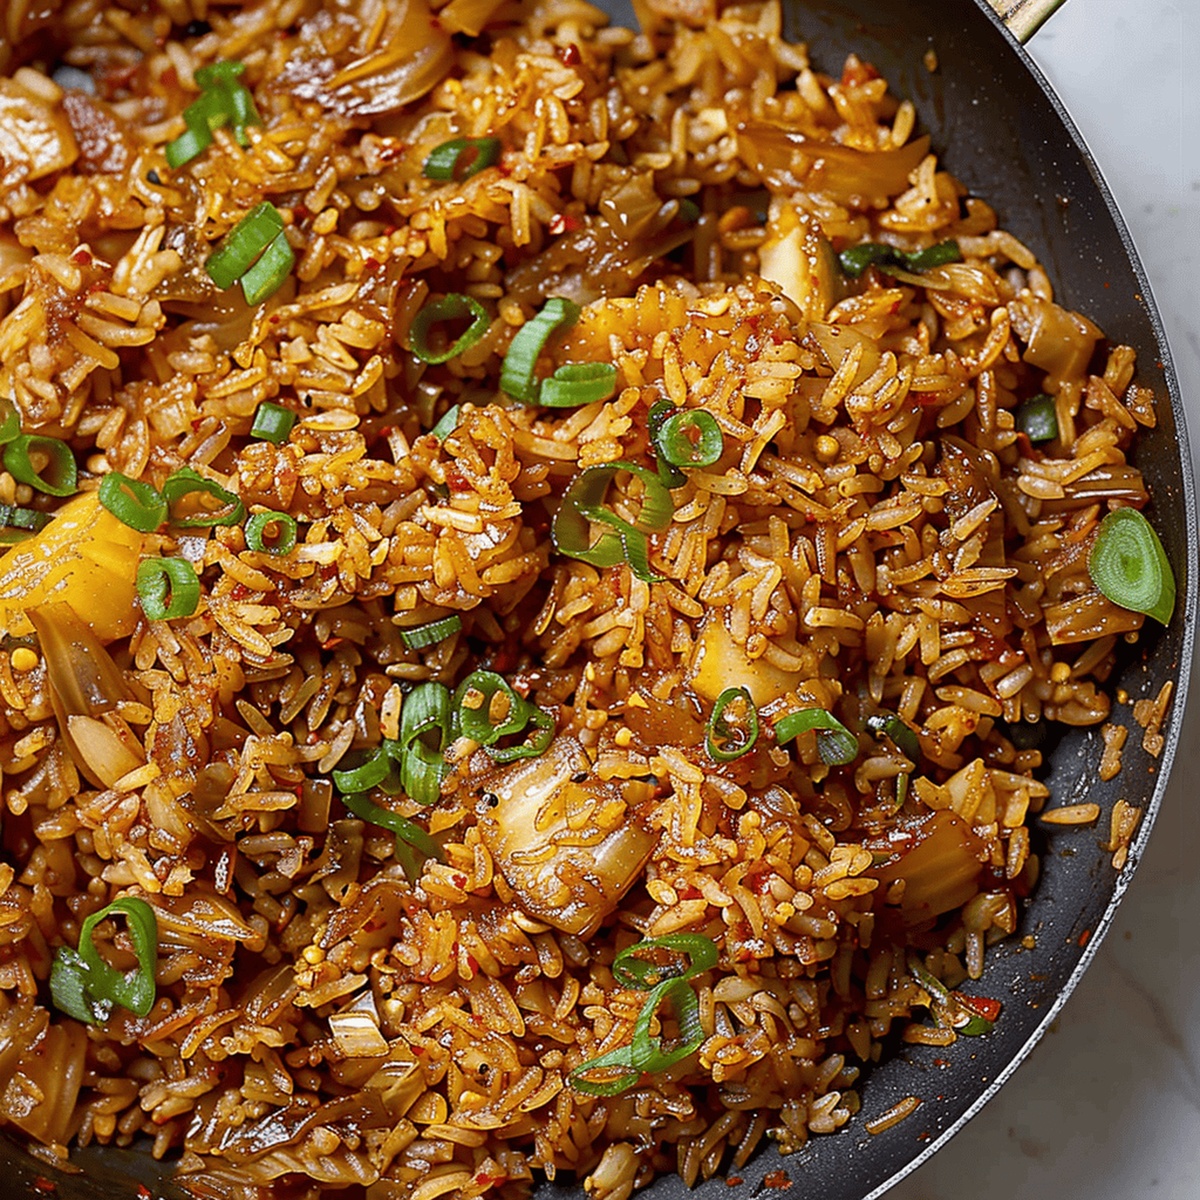
The vibrant dish combines crispy rice, tender vegetables, and that unmistakable kimchi punch.

Each bite tells a story of traditional Korean street food reimagined with simple ingredients.

Fragrant garlic and gochujang add depth to this quick and satisfying meal.

Weeknight dinners never looked more exciting or felt more delicious.

The recipe brings restaurant-quality comfort directly to your plate, offering a perfect balance of heat and savory goodness.

Get ready to master a Korean classic that will become your new favorite go-to meal.

Quick Recipe Overview

Prep Time: 10 minutes

Cook Time: 20 minutes

Total Time: 30 minutes

Calories: 400 kcal

Servings: 3

Kimchi Fried Rice Ingredient Rundown

For The Base:
  • Rice: Day-old rice works best, providing perfect texture and preventing mushiness.
  • Neutral Oil: Helps prevent sticking and ensures even cooking of ingredients.
For Flavor Builders:
  • Kimchi, Kimchi Brine: Adds tangy, spicy kick and authentic Korean depth.
  • Scallions: Provides fresh, sharp onion notes and beautiful green color garnish.
  • Gochugaru: Brings vibrant Korean red pepper heat and traditional seasoning.
  • Soy Sauce: Delivers umami richness and salty complexity.
For Creamy and Binding Elements:
  • Butter: Creates luxurious richness and helps ingredients caramelize.
  • Mayonnaise: Adds silky texture and subtle tang to sauce.
  • Sugar: Balances spiciness and enhances overall flavor profile.
For Finishing Touches:
  • Eggs: Creates creamy, runny yolk that blends with rice.
  • Sesame Oil: Introduces nutty, aromatic final layer.
  • Sesame Seeds: Provides delicate crunch and nutty undertone.
  • Salt: Helps sharpen and balance all existing flavors.

Tools to Stir Up the Best Kimchi Fried Rice

  • Wok: Large, deep pan perfect for stir-frying and sautéing ingredients.
  • Skillet or Frying Pan: Necessary for cooking crispy eggs with runny yolks.
  • Cutting Board: Essential for chopping scallions and kimchi.
  • Sharp Knife: Helps slice ingredients precisely and finely.
  • Mixing Bowl: Used for combining mayonnaise, kimchi brine, and seasonings.
  • Wooden Spoon or Spatula: Great for stirring and breaking rice clumps while cooking.
  • Measuring Spoons: Helps accurately measure seasonings and sugar.

Kimchi Fried Rice Instructions You’ll Love

  • Scallion Prep Kitchen magic begins with slicing scallions into delicate rings, setting aside some emerald green tips for a beautiful final touch.
  • Flavor Foundation Mix creamy mayonnaise with tangy kimchi juice, a sprinkle of sugar, fiery gochugaru, and rich soy sauce creating a zesty flavor bomb.
  • Sizzling Base Heat butter in a wok, letting scallions dance and release their aromatic essence. Add chopped kimchi, letting it soften and become tender.
  • Rice Transformation Pour the dreamy sauce into the wok, letting it meld with vegetables. Introduce rice, breaking up any stubborn clumps, stirring until everything harmonizes beautifully.
  • Seasoning Symphony Drizzle sesame oil and sprinkle salt, tasting and adjusting until the flavors sing perfectly.
  • Sunny Crowning Glory In a separate pan, gently fry eggs until whites are crisp and yolks remain luxuriously runny.
  • Elegant Presentation Plate the fragrant rice, crown with a golden egg, scatter reserved scallion tips and a sprinkle of sesame seeds for a restaurant-worthy finish.

Variations and Add-Ons for Kimchi Fried Rice

  • Pro Tips & Twists
  • Use day-old refrigerated rice for best texture, as cold rice separates easily and prevents mushy results.
  • Adjust gochugaru quantity to make the dish mild or fiery, matching personal spice preferences.
  • Swap fried eggs with crispy bacon, diced chicken, or tofu for added protein and exciting flavor variations.
  • Toss in extra vegetables like diced carrots, peas, or spinach to increase nutritional value and create colorful presentations.

Serving Kimchi Fried Rice with a Twist

  • Pair with Crisp Side Salad: Complement the rich, spicy kimchi fried rice with a light, refreshing salad dressed in a tangy vinaigrette to balance the bold flavors.
  • Elevate with Protein Boost: Add grilled chicken, shrimp, or tofu on the side to create a more substantial meal that satisfies bigger appetites.
  • Create Korean-Inspired Feast: Serve alongside classic banchan (Korean side dishes) like pickled vegetables, seaweed, or cucumber kimchi to enhance the authentic dining experience.
  • Enjoy with Cool Beverage: Pair with a cold Korean beer or a refreshing soju cocktail to cool down the spicy notes and cleanse the palate between bites.

How to Store and Reheat Kimchi Fried Rice the Right Way

  • Refrigerate Wisely: Store leftover kimchi fried rice in an airtight container in the refrigerator for up to 3-4 days. The flavors will continue to develop, making each bite even more delicious.
  • Reheat Safely: Warm the rice in a skillet over medium heat, adding a splash of water or neutral oil to prevent drying. Stir frequently to ensure even heating and maintain the rice's texture.
  • Freeze for Later: Pack the cooled fried rice in freezer-safe containers, separating portions for easy thawing. Freeze up to 1 month for a quick meal when you're short on time.
  • Prep Ahead Smartly: Chop kimchi and slice scallions in advance, storing them separately in the refrigerator. Cook the rice a day before to save time during meal preparation.
Print
clock clock iconcutlery cutlery iconflag flag iconfolder folder iconinstagram instagram iconpinterest pinterest iconfacebook facebook iconprint print iconsquares squares iconheart heart iconheart solid heart solid icon
Spicy Kimchi Fried Rice Recipe

Spicy Kimchi Fried Rice Recipe


5 Stars 4 Stars 3 Stars 2 Stars 1 Star

4.7 from 35 reviews

  • Total Time: 30 minutes
  • Yield: 3 1x

Description

Homemade kimchi fried rice blends Korean culinary traditions with simple, hearty ingredients. Spicy, tangy kimchi and crispy rice create a satisfying meal that connects home cooks with Seoul’s dynamic street food culture.


Ingredients

Scale
  • 2 cups (475 ml) cold cooked white rice
  • 1 cup (240 ml) drained Napa cabbage kimchi
  • 2 large eggs
  • 2 tbsps (30 g) unsalted butter
  • 1 tbsp (15 ml) neutral oil (canola or vegetable)
  • 4 medium scallions
  • 1 tbsp (15 ml) gochugaru (Korean pepper flakes)
  • 1 tbsp plus 1 ½ tsp (20 ml) soy sauce
  • 1 tbsp (15 ml) kimchi brine
  • 1 tbsp (12.5 g) granulated sugar
  • 1 tbsp (15 ml) mayonnaise
  • 1 tbsp (15 ml) toasted sesame oil
  • ¼ tsp (1.5 g) kosher salt
  • Toasted sesame seeds (for garnish)

Instructions

  1. Preparation: Thinly slice scallions, reserving dark green parts for garnish, and finely chop kimchi to ensure uniform flavor distribution.
  2. Sauce Creation: Whisk mayonnaise, kimchi brine, sugar, gochugaru, and soy sauce into a harmonious, smooth blend that will elevate the dish’s complexity.
  3. Aromatic Foundation: Melt butter in a wok over medium-high heat (350°F / 175°C), creating a golden base for sautéing scallions until fragrant and slightly softened.
  4. Flavor Building: Introduce chopped kimchi to the wok, stirring continuously until it becomes tender and develops a subtle caramelized character.
  5. Sauce Integration: Pour prepared sauce into the wok, coating kimchi and scallions thoroughly, allowing the liquid to reduce and concentrate flavors.
  6. Rice Transformation: Fold in cooked rice, breaking up any clusters and ensuring each grain absorbs the robust kimchi and sauce mixture while developing crispy edges during a 3-4 minute stir-fry.
  7. Final Seasoning: Drizzle sesame oil and sprinkle salt, adjusting to achieve a perfectly balanced taste profile.
  8. Egg Embellishment: In a separate skillet, create sunny-side-up eggs with set whites and lusciously runny yolks.
  9. Plating Artistry: Elegantly transfer kimchi fried rice to serving plates, crown with a perfectly cooked egg, and garnish with reserved scallion greens and a delicate sesame seed sprinkle.

Notes

  • Prep Precision: Finely chop kimchi into small, uniform pieces to ensure even flavor distribution and prevent large, overwhelming chunks in each bite.
  • Sauce Symphony: Whisk the sauce ingredients thoroughly to create a harmonious blend that enhances the overall taste and ensures no clumpy ingredients remain.
  • Heat Control: Maintain medium-high heat to achieve perfect caramelization of kimchi and create crispy rice edges without burning the ingredients.
  • Egg Perfection: Cook eggs separately with runny yolks to add a rich, creamy texture that beautifully complements the spicy and tangy kimchi fried rice.
  • Prep Time: 10 minutes
  • Cook Time: 20 minutes
  • Category: Lunch, Dinner, Snacks
  • Method: Frying
  • Cuisine: Korean

Nutrition

  • Serving Size: 3
  • Calories: 400
  • Sugar: 5 g
  • Sodium: 800 mg
  • Fat: 18 g
  • Saturated Fat: 6 g
  • Unsaturated Fat: 10 g
  • Trans Fat: 0 g
  • Carbohydrates: 50 g
  • Fiber: 2 g
  • Protein: 9 g
  • Cholesterol: 180 mg
Michael Rivera

Michael Rivera

Co-Founder & Culinary Instructor

Expertise

  • Classic French Cuisine
  • Artisanal Bread Baking
  • Plant-Based Culinary Innovation
  • Recipe & Menu Development
  • Interactive Online Instruction

Education

The French Culinary Institute (now part of the International Culinary Center)

  • Program: Classic Culinary Arts
  • Focus: An intensive curriculum rooted in classical French techniques, artisanal bread production, and contemporary culinary methods.

Michael Rivera is a seasoned chef and culinary instructor based in San Francisco, CA. Trained in Classic Culinary Arts at The French Culinary Institute, he refined his skills in Michelin-starred kitchens, mastering classic French techniques and artisanal bread baking. 

Passionate about making gourmet methods accessible, Michael co-founded thatsmyhome.com to share his expertise through interactive online lessons and innovative, plant-based recipes. He loves blending traditional techniques with modern ideas, encouraging home cooks to enjoy the art of cooking in a relaxed, fun environment.

Leave a Reply

Your email address will not be published. Required fields are marked *

Recipe rating 5 Stars 4 Stars 3 Stars 2 Stars 1 Star