Crispy Hasselback Butternut Squash Recipe

Cozy Hasselback Butternut Squash Delight Recipe for Fall Comfort

Golden autumn days call for comforting sides that spark joy at the dinner table, and this hasselback butternut squash recipe delivers pure culinary magic.

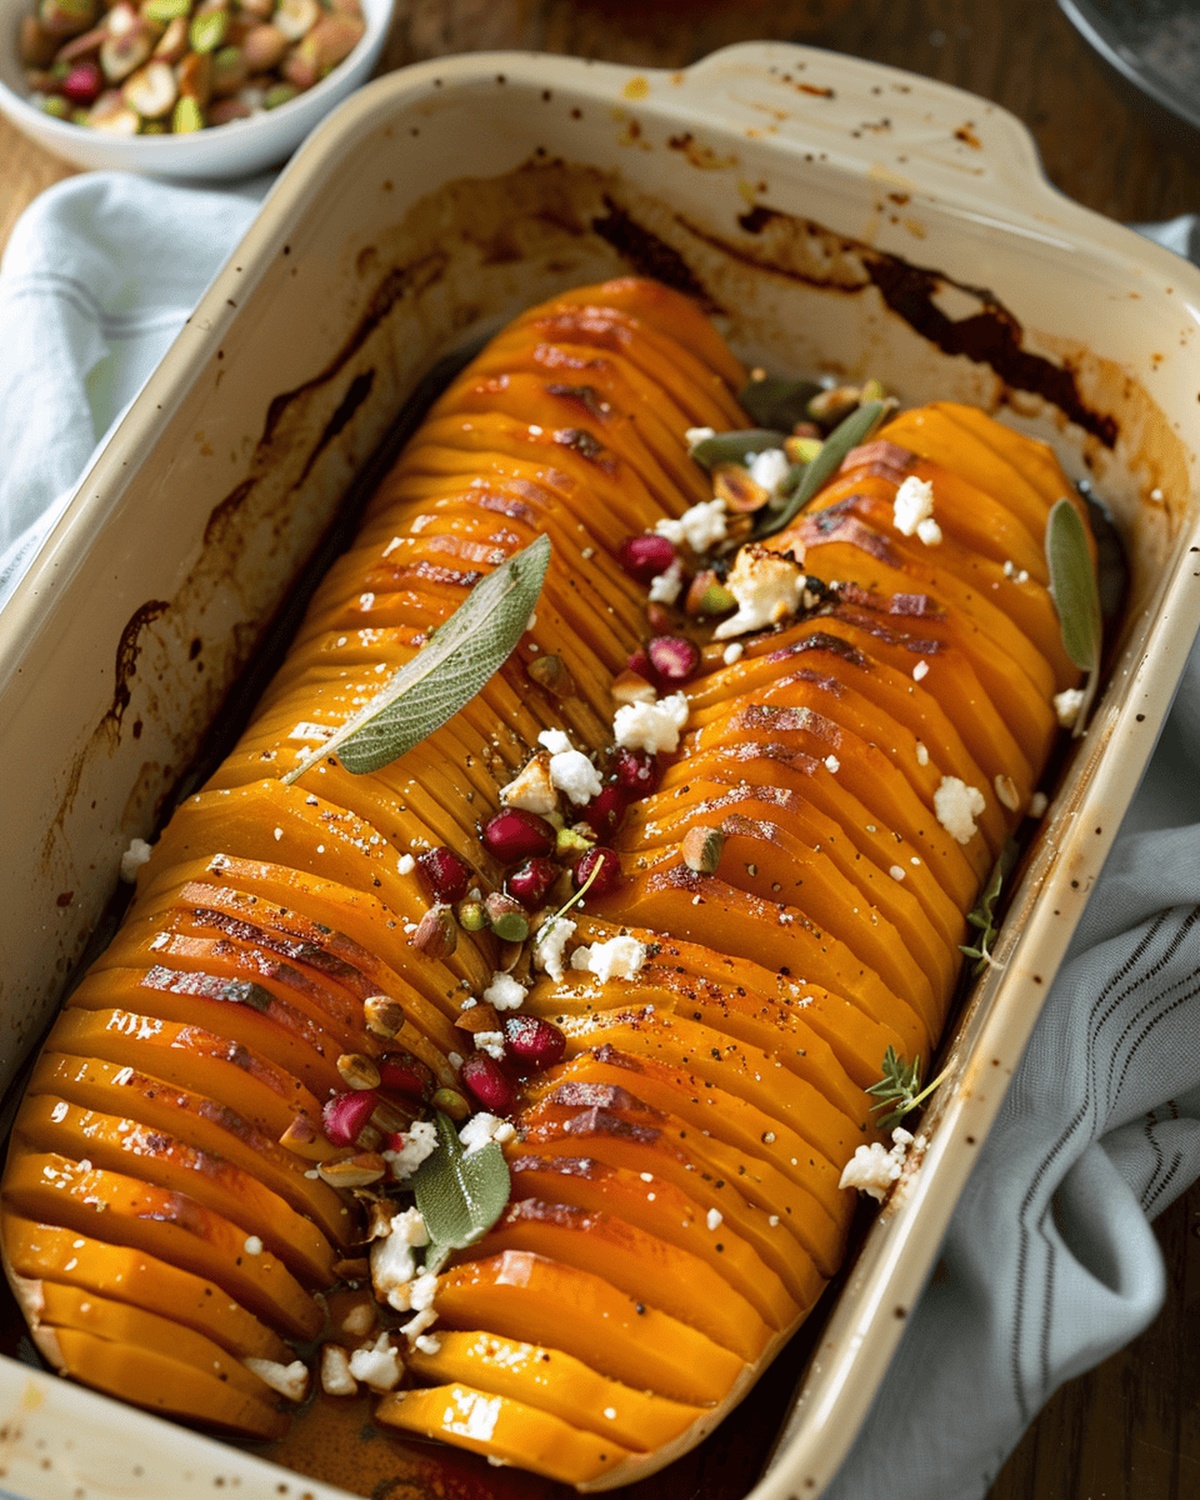
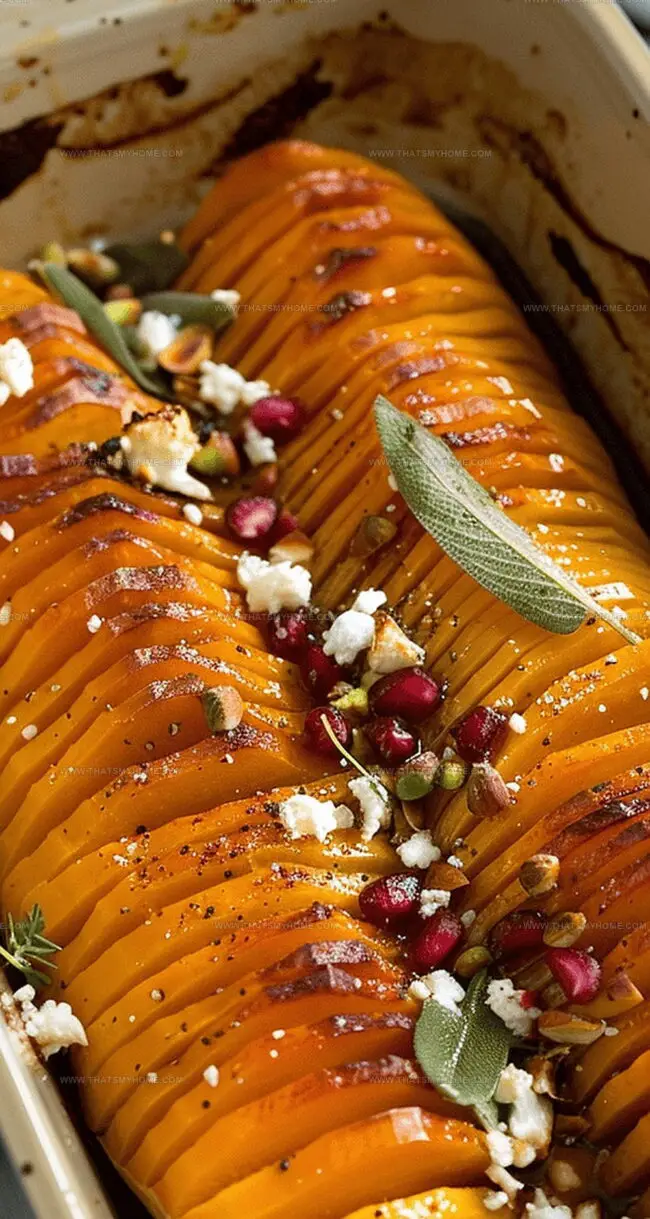
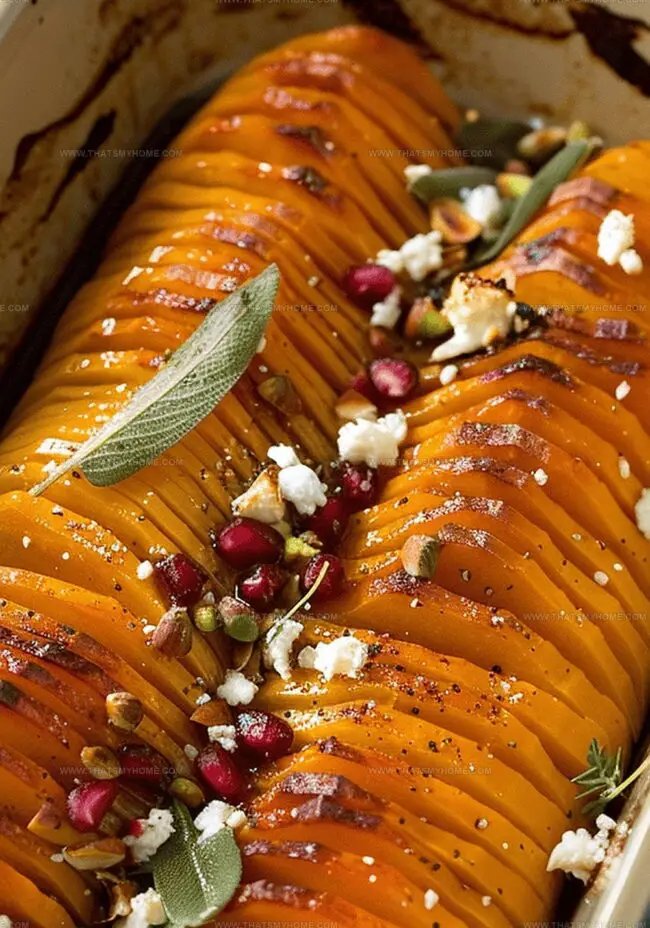
Slicing delicate butternut squash in elegant, fan-like patterns creates a stunning visual feast that catches everyone’s attention.

Crispy edges mingled with soft, buttery centers make this dish irresistibly delectable.

The technique looks complex but comes together effortlessly with a few simple moves.

Aromatic herbs and a sprinkle of parmesan cheese elevate each bite into a gourmet experience.

Savory and slightly sweet, this squash side dish promises to steal the spotlight at any meal.

Get ready to impress with this showstopping vegetable creation that turns ordinary dinners into memorable moments.

Quick Recipe Overview

Prep Time: 20 minutes

Cook Time: 80 minutes

Total Time: 1 hour 40 minutes

Calories: 215 kcal

Servings: 5

Hasselback Butternut Squash Ingredient

For Squash Base:
  • Butternut Squash: A creamy, sweet vegetable perfect for roasting with rich caramelized edges that brings warmth to the dish.
  • Olive Oil: Helps create a golden, crispy exterior and adds smooth richness to enhance the squash's natural flavor.
For Flavor Enhancers:
  • Maple Syrup: Adds a luxurious, sweet depth that caramelizes beautifully and complements the squash's earthy notes.
  • Red Pepper Flakes: Introduces a subtle kick of heat that balances the sweetness and adds complexity.
  • Sage Leaves: Provides an aromatic, herbaceous touch with a subtle peppery essence that pairs perfectly with roasted squash.
For Seasoning:
  • Salt: Amplifies the natural sweetness and helps develop a deeper flavor profile.
  • Black Pepper: Adds a gentle warmth and brings out the squash's natural complexity.

Tools to Make Hasselback Squash Look Fancy

  • Chef's Knife: Sharp blade for precise cutting and peeling of squash.
  • Cutting Board: Sturdy surface for safe preparation.
  • Baking Dish: Snug ceramic or glass dish to roast squash.
  • Small Bowl: For mixing maple syrup glaze.
  • Whisk: To blend syrup and olive oil smoothly.
  • Chopsticks: Essential for creating classic hasselback cuts without slicing through.
  • Pastry Brush (optional): Helpful for basting squash with glaze.
  • Measuring Tablespoon: For accurate oil and syrup measurements.

How to Roast Butternut Squash with Stunning Slices

  • Kitchen Preparation Warm up your oven to a toasty 425°F. Get your baking dish ready for a delicious adventure.
  • Squash Transformation Slice the butternut squash down its length, scooping out seeds. Gently remove the outer skin with a careful hand. Massage olive oil all over the squash halves, sprinkling a generous layer of salt and pepper.
  • First Roasting Phase Place squash cut-side down in the baking dish. Let it dance in the oven for 15-20 minutes until it starts to soften and become tender.
  • Flavor Magic Whisk together maple syrup, a splash of olive oil, and a whisper of red pepper flakes to create a tantalizing glaze.
  • Artistic Cutting Let the squash cool slightly. Position chopsticks alongside to prevent cutting all the way through. Create beautiful thin shingles with your knife, keeping the bottom intact.
  • Final Flourish Nestle fragrant sage leaves between the squash shingles. Drizzle half the maple mixture over the creation. Return to the oven for 45-60 minutes, occasionally brushing with remaining glaze until the squash becomes meltingly soft and caramelized.

Tips for Flavorful Roasted Squash Every Time

  • Add crushed red pepper flakes or a dash of cayenne to the maple glaze for a subtle heat that balances the dish's sweetness and creates a more complex flavor profile.
  • Sprinkle crumbled goat cheese or grated parmesan between the squash shingles during the last 15 minutes of roasting for a creamy, tangy enhancement that elevates the entire dish.
  • Scatter toasted pecans or sliced almonds over the finished squash just before serving to introduce a delightful textural contrast and nutty depth to the caramelized edges.

Ways to Plate This Squash with a Gourmet Look

  • Elevate with Fresh Herbs: Sprinkle chopped parsley or chives over the roasted butternut squash for a burst of fresh flavor and vibrant color.
  • Pair with Protein: Serve alongside roasted chicken, grilled salmon, or crumbled goat cheese to create a complete and satisfying meal.
  • Add Crunch Factor: Scatter toasted pumpkin seeds or chopped pecans on top to introduce a delightful textural contrast and nutty richness.
  • Create a Festive Platter: Arrange the hasselback squash on a wooden board with additional sage leaves and a drizzle of extra maple glaze for an elegant presentation that will impress dinner guests.

Storing Hasselback Squash Without Drying

  • Maximize Meal Prep: Slice and score the squash up to a day ahead, storing it covered in the refrigerator to save time during busy cooking hours.
  • Refrigerate Wisely: Store leftover hasselback squash in an airtight container for up to 4 days, ensuring maximum flavor and texture retention.
  • Reheat with Care: Warm refrigerated squash in a 350°F oven for 10-15 minutes, covering with foil to prevent moisture loss and maintain its delicious crispy edges.
  • Freeze for Later: Wrap cooled squash tightly in plastic wrap and aluminum foil, then freeze for up to 2 months – perfect for quick future meals or unexpected dinner guests.
Print
clock clock iconcutlery cutlery iconflag flag iconfolder folder iconinstagram instagram iconpinterest pinterest iconfacebook facebook iconprint print iconsquares squares iconheart heart iconheart solid heart solid icon
Crispy Hasselback Butternut Squash Recipe

Crispy Hasselback Butternut Squash Recipe


5 Stars 4 Stars 3 Stars 2 Stars 1 Star

4.6 from 16 reviews

  • Total Time: 1 hour 40 minutes
  • Yield: 5 1x

Description

Chefs craft this hasselback butternut squash delight with Mediterranean-inspired ingredients that elevate seasonal produce. Layers of herbal complexity and roasted golden edges invite hungry palates to savor each carefully prepared bite.


Ingredients

Scale
  • 1 butternut squash (large, about 3 lbs / 1.36 kg)
  • 3 tbsps (45 ml) extra-virgin olive oil, divided
  • 6 to 8 sage leaves (fresh)
  • 1 tbsp (15 g) kosher salt
  • 1 tsp black pepper (freshly ground)
  • 2 tbsps (30 ml) maple syrup (pure)
  • ¼ to ½ tsp red pepper flakes
  • ½ cup feta cheese (crumbled)
  • ¼ cup pistachios or pepitas (salted, chopped)
  • ¼ cup cherries (dried)
  • 2 tbsps pomegranate seeds
  • 2 tbsps parsley (finely chopped)

Instructions

  1. Preparation Setup: Preheat oven to 425°F (218°C), positioning rack centrally for consistent heat circulation.
  2. Squash Preparation: Halve butternut squash lengthwise, scoop out seeds, and carefully peel exterior using a sharp vegetable peeler, creating a smooth surface for seasoning.
  3. Initial Seasoning: Thoroughly coat squash with olive oil, generously distribute kosher salt and black pepper, ensuring complete flavor infusion across entire surface.
  4. First Roasting Phase: Place squash cut-side down in ceramic baking dish, roast until edges begin caramelizing and surfaces soften (15-20 minutes), developing rich underlying flavors.
  5. Glaze Creation: Whisk maple syrup, additional olive oil, and red pepper flakes in a mixing bowl, crafting a vibrant, nuanced coating that will elevate the squash’s natural sweetness.
  6. Precision Cutting: Cool slightly, then position wooden chopsticks alongside squash halves as cutting guides, creating elegant thin shingles without completely separating sections.
  7. Aromatic Enhancement: Interlace fresh sage leaves between newly formed squash shingles, introducing complex herbal undertones and visual sophistication.
  8. Glazing and Final Roasting: Drizzle half the maple mixture over sculpted squash, reapply seasoning, then return to oven, basting periodically until edges crisp and interior becomes luxuriously tender (45-60 minutes).

Notes

  • Knife Mastery: Use a sharp chef’s knife and steady hand when slicing to create precise, uniform cuts without breaking the squash structure.
  • Chopstick Technique: Wooden chopsticks prevent accidental over-cutting, creating beautiful accordion-like slices while keeping the base intact.
  • Glaze Application: Brush maple glaze generously and repeatedly to develop deep caramelization and prevent squash from drying out during extended roasting.
  • Temperature Control: Monitor oven heat carefully; lower temperature slightly if edges brown too quickly to ensure even, tender cooking throughout the squash.
  • Prep Time: 20 minutes
  • Cook Time: 80 minutes
  • Category: Dinner, Appetizer
  • Method: Roasting
  • Cuisine: Swedish

Nutrition

  • Serving Size: 5
  • Calories: 215
  • Sugar: 7 g
  • Sodium: 380 mg
  • Fat: 14 g
  • Saturated Fat: 2 g
  • Unsaturated Fat: 10 g
  • Trans Fat: 0 g
  • Carbohydrates: 24 g
  • Fiber: 4 g
  • Protein: 6 g
  • Cholesterol: 5 mg
Michael Rivera

Michael Rivera

Co-Founder & Culinary Instructor

Expertise

  • Classic French Cuisine
  • Artisanal Bread Baking
  • Plant-Based Culinary Innovation
  • Recipe & Menu Development
  • Interactive Online Instruction

Education

The French Culinary Institute (now part of the International Culinary Center)

  • Program: Classic Culinary Arts
  • Focus: An intensive curriculum rooted in classical French techniques, artisanal bread production, and contemporary culinary methods.

Michael Rivera is a seasoned chef and culinary instructor based in San Francisco, CA. Trained in Classic Culinary Arts at The French Culinary Institute, he refined his skills in Michelin-starred kitchens, mastering classic French techniques and artisanal bread baking. 

Passionate about making gourmet methods accessible, Michael co-founded thatsmyhome.com to share his expertise through interactive online lessons and innovative, plant-based recipes. He loves blending traditional techniques with modern ideas, encouraging home cooks to enjoy the art of cooking in a relaxed, fun environment.

Leave a Reply

Your email address will not be published. Required fields are marked *

Recipe rating 5 Stars 4 Stars 3 Stars 2 Stars 1 Star