Weeknight dinners get a delightful upgrade with these irresistible cream cheese crescent bites that blend creamy richness with flaky pastry perfection.
Soft cream cheese mingles with savory herbs, creating a mouthwatering filling that nestles inside golden-brown crescent dough.
Each bite delivers a perfect balance of tangy and smooth flavors that dance across your palate.
The recipe comes together quickly, making it ideal for busy evenings or spontaneous gatherings.
Simple ingredients transform into an appetizer that feels surprisingly elegant and sophisticated.
You’ll love how these little bites disappear from the plate in seconds, sparking conversations and delighting everyone who takes a taste.
These crescent bites promise to be your new go-to snack that never fails to impress.
Quick Recipe Overview
Prep Time: 20 minutes
Cook Time: 15 minutes
Total Time: 35 minutes
Calories: 164 kcal
Servings: 13
Cream Cheese Crescent Bites Ingredient Guide
For Dough Base:
Crescent Roll Dough: Soft, buttery foundation that creates a flaky exterior perfect for holding sweet fillings, choose pre-rolled tubes for convenience.
Parchment Paper: Essential for preventing sticking and ensuring easy cleanup, select a high-quality non-stick variety.
For Filling Components:
Cream Cheese: Creamy, tangy base that provides rich texture and depth, select full-fat version for maximum flavor and smoothness.
Egg Yolk: Adds richness and helps bind the filling, choose fresh eggs from local sources for best results.
Granulated Sugar: Sweetens the cream cheese mixture, opt for fine-grain sugar for smooth incorporation.
Vanilla Extract: Enhances overall flavor profile, use pure extract for most authentic taste.
For Finishing and Glaze:
Egg White: Creates beautiful golden sheen when brushed on top, helps achieve appetizing appearance.
Powdered Sugar: Provides smooth, sweet glaze with perfect drizzling consistency.
Milk: Helps adjust glaze texture and adds subtle creaminess, whole milk recommended for richness.
Tools You’ll Need for Cream Cheese Crescent Bites
Mixing Bowl: Medium-sized bowl for combining cream cheese filling ingredients.
Fork: For beating egg white and creating egg wash.
Baking Sheet: To hold and bake the crescent bites evenly.
Parchment Paper: Prevents sticking and ensures easy cleanup.
Small Bowl: For preparing the glaze mixture.
Measuring Spoons: To measure vanilla extract and sugar precisely.
Measuring Cups: For accurate liquid and sugar measurements.
How to Assemble Cream Cheese Crescent Bites Easily
Oven Preparation Warm up your kitchen by setting the oven to a cozy 350°F. Grab a baking sheet and line it with parchment paper to create a smooth landing spot for your tasty treats.
Dough Magic Gently unroll the crescent dough, transforming those delicate triangles into a canvas for your culinary creativity. Smooth out any lines to create a perfect base for your filling.
Creamy Mixture Blend cream cheese with a touch of sweetness and a hint of vanilla. Whisk everything together until the mixture becomes silky smooth and irresistibly tempting.
Bite Construction Carefully spoon the dreamy cream cheese mixture onto the center of each dough piece. Fold the edges with gentle care, creating little pockets of pure deliciousness while letting a peek of the filling show.
Golden Touch Give your crescents a beautiful shine by brushing them with a light egg wash. This will help them transform into gorgeous golden bites that look as amazing as they taste.
Baking Moment Slide the baking sheet into the warm oven. Watch as the crescents puff up and turn a beautiful golden brown, filling your kitchen with an incredible aroma that will make everyone’s mouth water.
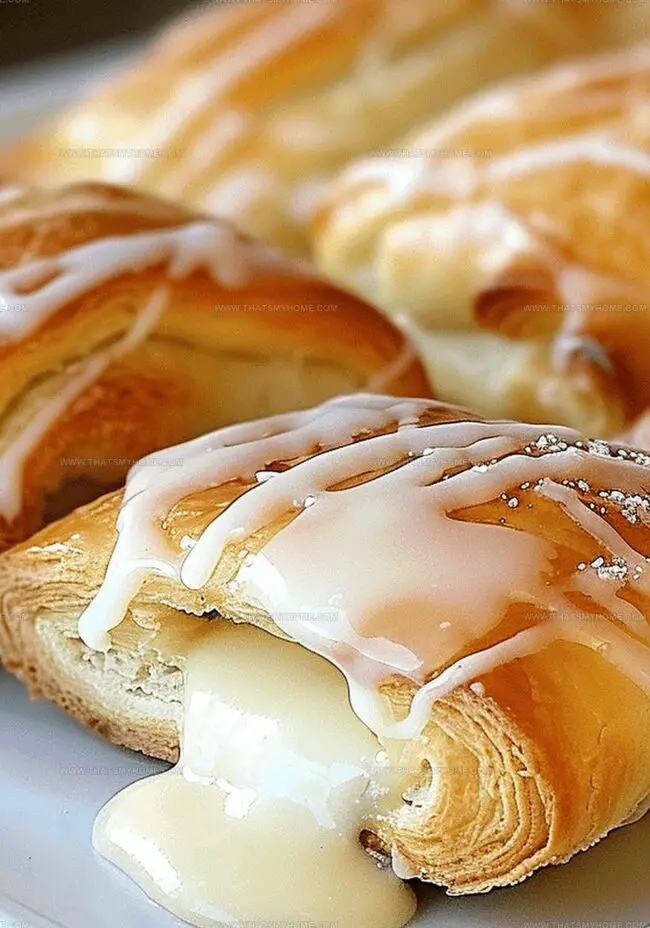
Sweet Finale Whip up a quick glaze by mixing powdered sugar with a splash of milk and vanilla. Drizzle this magical topping over the warm crescents, letting it cascade down the sides in a tempting pattern.
Tips to Elevate Cream Cheese Crescent Bites
Swap cream cheese for ricotta, add fruit preserves, or mix in chocolate chips for exciting flavor twists that transform the basic recipe.
Gently roll out the dough and seal edges completely to prevent filling leakage, ensuring a clean and professional-looking bite every time.
Prepare the bites up to 24 hours in advance, storing them unbaked in the refrigerator and adding 2-3 extra minutes to baking time for chilled dough.
Sprinkle cinnamon into the cream cheese mixture or add a dash of lemon zest for a bright, unexpected flavor profile that elevates the entire bite.
Use low-fat cream cheese, gluten-free crescent dough, or sugar substitutes to create a version that accommodates different nutritional needs and preferences.
Serving Ideas for Cream Cheese Crescent Bites
Serve with Breakfast Elegance: Pair these cream cheese crescent bites with a fresh cup of coffee or morning tea for a delightful start to your day. The delicate pastry and sweet cream cheese filling create a perfect morning treat.
Brunch Party Centerpiece: Arrange these golden bites on a beautiful platter as a stunning centerpiece for your next brunch gathering. Their elegant appearance and irresistible flavor will impress your guests and spark conversation.
Sweet Dessert Companion: Transform these bites into a delectable dessert by serving them alongside a scoop of vanilla ice cream or a dollop of whipped cream. The warm, flaky pastry complements the cool, creamy accompaniment beautifully.
Afternoon Snack Delight: Enjoy these crescent bites as a mid-afternoon pick-me-up with a cold glass of milk or a refreshing fruit smoothie. Their portable size makes them an ideal snack for busy days or leisurely afternoons.
Storing Cream Cheese Crescent Bites the Smart Way
Store Smartly: Keep leftover cream cheese crescent bites in an airtight container inside the refrigerator for up to 3-4 days. The cold environment helps maintain their texture and prevents bacterial growth.
Freeze for Future Snacking: Carefully place cooled bites in a freezer-safe container with parchment paper between layers. Frozen treats will stay delicious for 2-3 weeks, perfect for quick grab-and-go moments.
Reheat with Care: Warm refrigerated or thawed bites in a preheated oven at 325°F for 5-7 minutes to restore their crispy exterior and soft, creamy interior. Avoid microwave reheating to prevent soggy texture.
Prep in Advance: Mix cream cheese filling and assemble bites up to 24 hours before baking. Cover and refrigerate the unbaked bites, then bake fresh when ready to serve for maximum flavor and freshness.
Savory cream cheese crescent bites promise a delightful appetizer perfect for gatherings. Buttery, flaky pastry wrapped around creamy herbed filling will satisfy guests seeking a quick, elegant party treat.
Ingredients
Scale
2 cans (8 oz/226 g) refrigerated crescent roll dough
1 package (8 oz/226 g) cream cheese, softened
½ cup (100 g) granulated sugar
1 egg yolk
1 teaspoon vanilla extract
1 cup (120 g) powdered sugar
1–2 tablespoons milk
½ teaspoon vanilla extract
1 egg white (for egg wash)
Instructions
Preparation: Preheat the oven to 350°F (175°C) and line a baking sheet with parchment paper for effortless release and cleanup.
Dough Preparation: Unroll the crescent roll dough on a flat surface, meticulously sealing the perforations to create a seamless base for the delicate pastry bites.
Filling Creation: Whip the cream cheese, egg yolk, vanilla extract, and granulated sugar in a mixing bowl until the mixture transforms into a velvety, homogeneous cream.
Assembly: Carefully place a precise dollop of the cream cheese mixture in the center of each dough section, elegantly folding the edges to form a delicate parcel that partially reveals the luscious filling.
Egg Wash and Baking: Gently brush the assembled bites with whisked egg white, then arrange them on the prepared baking sheet with ample spacing. Bake for 12-15 minutes, vigilantly monitoring until they achieve a golden, puffy perfection.
Glaze Finishing: While the bites cool, craft a silky glaze by blending powdered sugar, milk, and vanilla extract, adjusting the consistency for a smooth, drizzle-ready texture.
Serving: Once slightly cooled, artfully drizzle the glaze over the bites, allowing it to set briefly before presenting these irresistible cream cheese crescents.
Notes
Seal Edges Carefully: Press dough perforations tightly to prevent filling leakage and maintain a clean, professional-looking bite.
Temperature Matters: Use room temperature cream cheese for smoother mixing and easier spreading, ensuring a creamy, lump-free filling.
Brush Technique: Apply egg white wash sparingly and evenly to achieve a stunning golden-brown color without making the pastry too wet.
Glaze Consistency: Adjust milk quantity gradually when making the glaze to reach the perfect drizzling texture – thick enough to cling but thin enough to flow smoothly.
The French Culinary Institute (now part of the International Culinary Center)
Program: Classic Culinary Arts
Focus: An intensive curriculum rooted in classical French techniques, artisanal bread production, and contemporary culinary methods.
Michael Rivera is a seasoned chef and culinary instructor based in San Francisco, CA. Trained in Classic Culinary Arts at The French Culinary Institute, he refined his skills in Michelin-starred kitchens, mastering classic French techniques and artisanal bread baking.
Passionate about making gourmet methods accessible, Michael co-founded thatsmyhome.com to share his expertise through interactive online lessons and innovative, plant-based recipes. He loves blending traditional techniques with modern ideas, encouraging home cooks to enjoy the art of cooking in a relaxed, fun environment.


Michael Rivera
Co-Founder & Culinary Instructor
Expertise
Education
The French Culinary Institute (now part of the International Culinary Center)
Michael Rivera is a seasoned chef and culinary instructor based in San Francisco, CA. Trained in Classic Culinary Arts at The French Culinary Institute, he refined his skills in Michelin-starred kitchens, mastering classic French techniques and artisanal bread baking.
Passionate about making gourmet methods accessible, Michael co-founded thatsmyhome.com to share his expertise through interactive online lessons and innovative, plant-based recipes. He loves blending traditional techniques with modern ideas, encouraging home cooks to enjoy the art of cooking in a relaxed, fun environment.