Worcestershire Sauce: Introduces umami and depth, choose traditional version for authentic taste.
Salt, Pepper: Essential seasoning agents that balance and enhance overall flavor profile.
Tools That Make Cheesesteak Pasta Easy
Large Pot: Essential for boiling pasta shells with plenty of room.
Large Skillet: Perfect for cooking ground beef and sautéing vegetables.
Medium Saucepan: Ideal for creating smooth, creamy cheese sauce.
Baking Dish: Needed to assemble and bake stuffed pasta shells.
Whisk: Crucial for preventing lumps in cheese sauce and mixing ingredients.
Cutting Board: Used for chopping vegetables and herbs.
Chef’s Knife: Sharp tool for precise vegetable and herb cutting.
Colander: Helps drain pasta shells after cooking.
Wooden Spoon: Great for stirring meat and vegetables while cooking.
Measuring Cups and Spoons: Ensures accurate ingredient quantities.
How to Cook Cheesesteak Pasta without Fuss
Kitchen Preparation Kitchen setup with clean workspace, essential tools, and all ingredients ready for cooking adventure.
Pasta Foundation Boil salted water and cook jumbo pasta shells until soft yet firm. Drain and let cool naturally.
Meaty Goodness Brown ground beef or steak in skillet with sizzling olive oil. Add colorful onions, peppers, and aromatic garlic. Season with Worcestershire sauce, creating rich flavor profile.
Creamy Cheese Transformation Craft velvety cheese sauce by melting butter, whisking in flour, and slowly incorporating milk. Blend cheddar and Parmesan until silky smooth.
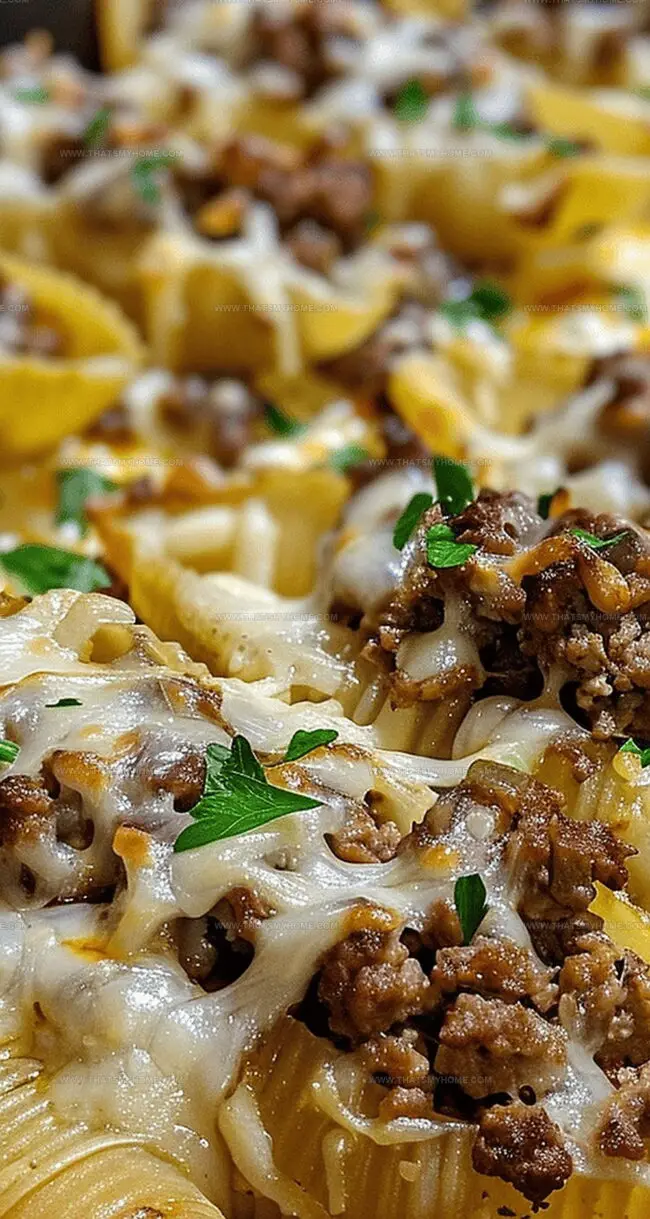
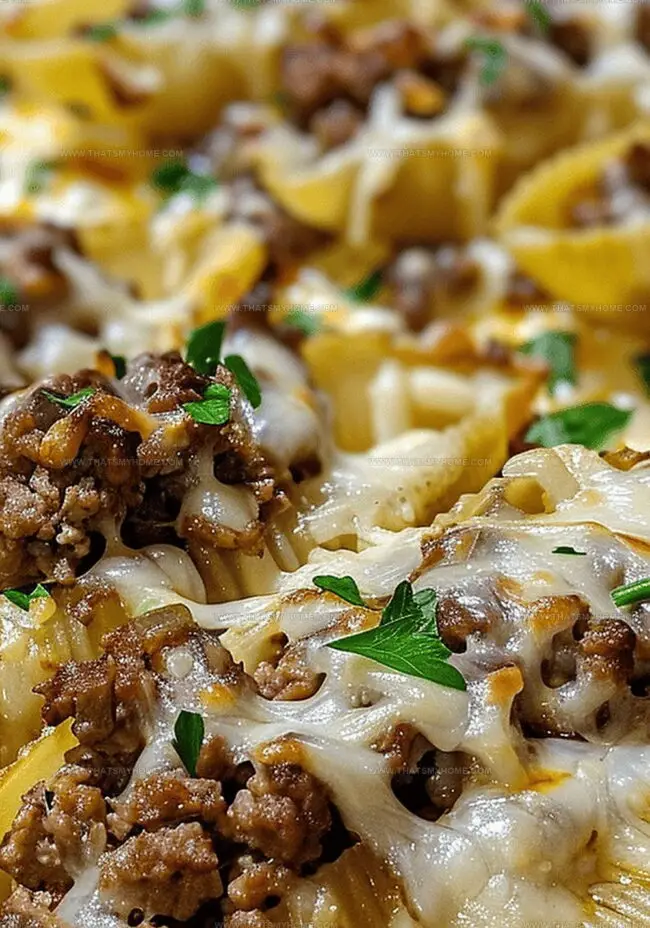
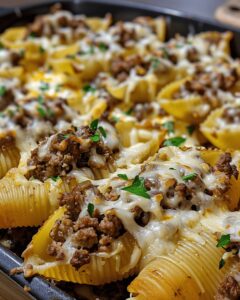
Shell Stuffing Carefully fill each pasta shell with savory meat mixture. Arrange beautifully in baking dish, creating delicious landscape.
Baking Brilliance Cover dish with foil, bake at 375°F. Uncover for final golden moments, allowing cheese to bubble and edges to crisp.
Finishing Touches Sprinkle fresh herbs, creating vibrant color contrast. Serve immediately with crisp side salad or warm garlic bread.
Ways to Enhance Flavor in Cheesesteak Pasta
Swap ground beef with sliced ribeye, shaved roast beef, or even pulled chicken for different protein variations and unique flavor profiles.
Experiment with Swiss, provolone, or pepper jack cheeses to create exciting taste combinations that elevate the classic cheesesteak experience.
Incorporate sautéed mushrooms, jalapeños, or roasted red peppers to introduce extra depth and nutritional value to the pasta shells.
Prepare the entire dish in advance and refrigerate up to 24 hours before baking, which makes meal prep convenient for busy weeknights or entertaining guests.
Sprinkle red pepper flakes, drizzle hot sauce, or add a dash of steak seasoning to give the pasta shells an extra kick of flavor and personalized heat level.
How to Serve Cheesesteak Pasta Creatively
Pair with Fresh Salad: Toss a crisp green salad with mixed lettuces, cherry tomatoes, and a light vinaigrette to balance the rich, cheesy pasta shells.
Create a Hearty Bread Side: Serve warm garlic bread or crusty artisan bread to soak up the delicious cheese sauce and complement the meaty filling.
Add Zesty Vegetable Crunch: Prepare quick pickled vegetables like quick-pickled cucumbers or pepperoncini on the side to provide a tangy contrast to the creamy pasta dish.
Make it a Complete Meal: Complement the cheesesteak pasta with a light beer or a glass of red wine to enhance the robust flavors of the beef and cheese.
Storage Tips for Cheesesteak Pastas
Store Smartly: Transfer leftover Cheesesteak Pasta Delight into airtight containers within 2 hours of cooking to maintain freshness and prevent bacterial growth.
Refrigerate Quickly: Seal the dish in sealed containers and store in the refrigerator for up to 3-4 days. Keep the temperature consistently below 40°F to ensure food safety.
Freeze for Later: Pack individual portions in freezer-safe containers or heavy-duty freezer bags. Freeze for maximum 2-3 months. Label containers with the date to track storage time.
Reheat with Care: Thaw frozen pasta in the refrigerator overnight. Warm in the oven at 350°F, covered with foil, for 15-20 minutes. Add a splash of milk or broth to restore moisture and prevent drying out. Stir occasionally to distribute heat evenly and maintain the creamy texture of the cheese sauce.
Classic Philly cheesesteak pasta delight combines tender beef, melted provolone, and caramelized onions in a hearty comfort meal. Pasta lovers will savor this quick, satisfying dinner that brings Pennsylvania’s iconic sandwich into a delicious one-pot experience you can easily create at home.
Ingredients
Scale
1 lb (454 grams) ground beef or thinly sliced steak
12–16 jumbo pasta shells
1 cup shredded provolone cheese or mozzarella
1 cup shredded cheddar cheese
¼ cup shredded Parmesan cheese
1 ½ cups milk
2 tbsps butter
2 tbsps all-purpose flour
1 small onion, diced
1 small green bell pepper, diced
2 cloves garlic, minced
1 tbsp olive oil
1 tsp Worcestershire sauce
½ tsp salt
¼ tsp black pepper
Chopped parsley or fresh chives
Salt and pepper, to taste
Instructions
Pasta Preparation: Boil salted water and cook jumbo pasta shells until tender, about 8-10 minutes. Drain and set aside to cool slightly.
Meat and Vegetable Sauté: Heat olive oil in a skillet over medium heat. Brown ground beef or steak, breaking into small crumbles. Drain excess fat, then add onions, bell peppers, and garlic. Sauté until vegetables soften, approximately 3-4 minutes.
Seasoning and Cheese Integration: Season meat mixture with Worcestershire sauce, salt, and black pepper. Fold in shredded provolone, allowing flavors to meld.
Cheese Sauce Creation: In a separate saucepan, melt butter and whisk in flour, cooking until golden. Gradually add milk, whisking constantly to prevent lumps. Simmer until sauce thickens, then remove from heat and incorporate sharp cheddar and Parmesan. Adjust seasoning to taste.
Assembly and Baking: Preheat oven to 375°F (190°C). Spread a thin cheese sauce layer in a 9×13 inch baking dish. Stuff cooled pasta shells with cheesesteak filling and arrange in the dish. Pour remaining cheese sauce over shells, covering completely.
Final Cooking and Serving: Cover with foil and bake for 20 minutes. Remove foil and continue baking 5-10 minutes until golden and crispy. Garnish with fresh parsley or chives. Serve immediately with a side salad or garlic bread.
Notes
Pasta Perfection: Cook shells al dente to prevent mushiness and ensure ideal texture for filling.
Meat Mastery: Drain excess fat after browning to keep the dish from becoming greasy and maintain clean flavors.
Cheese Technique: Gradually add milk to roux while whisking to create a silky-smooth sauce without unwanted lumps.
Baking Brilliance: Cover with foil initially to prevent excessive browning and ensure even heating throughout the dish.
The French Culinary Institute (now part of the International Culinary Center)
Program: Classic Culinary Arts
Focus: An intensive curriculum rooted in classical French techniques, artisanal bread production, and contemporary culinary methods.
Michael Rivera is a seasoned chef and culinary instructor based in San Francisco, CA. Trained in Classic Culinary Arts at The French Culinary Institute, he refined his skills in Michelin-starred kitchens, mastering classic French techniques and artisanal bread baking.
Passionate about making gourmet methods accessible, Michael co-founded thatsmyhome.com to share his expertise through interactive online lessons and innovative, plant-based recipes. He loves blending traditional techniques with modern ideas, encouraging home cooks to enjoy the art of cooking in a relaxed, fun environment.

Michael Rivera
Co-Founder & Culinary Instructor
Expertise
Education
The French Culinary Institute (now part of the International Culinary Center)
Michael Rivera is a seasoned chef and culinary instructor based in San Francisco, CA. Trained in Classic Culinary Arts at The French Culinary Institute, he refined his skills in Michelin-starred kitchens, mastering classic French techniques and artisanal bread baking.
Passionate about making gourmet methods accessible, Michael co-founded thatsmyhome.com to share his expertise through interactive online lessons and innovative, plant-based recipes. He loves blending traditional techniques with modern ideas, encouraging home cooks to enjoy the art of cooking in a relaxed, fun environment.